Showing posts with label vintage style. Show all posts

Monday, October 3, 2011

TBS DT: There's a cure for what ails you...

Hi crafty folks! Welcome to October. Here in Maryland October blew in on a brisk wind. It's oh-so-cold right now, and the sun doesn't even have the decency to push away the clouds. Over in the UK our friends are experiencing a record-breaking heat wave. C'mon Mother Nature, get it together! This week also rings in a new challenge. At The Beary Scrap Challenge blog, we're putting our monthly sketch challenges on hold for a while and replacing them with fun theme-based challenges similar to the ones we always do on the 15th of the month. What better way to celebrate than to have a crafty

Haha! Yes, I do think I'm funny. My little play on words makes me giggle. :)

Now, let's set aside all this fun and frivolity and get down to business. This week I have a little bit of spooky art to share with you. I'm participating in a "Chunky Halloween House" swap over at Craftster and this is one of my houses.


The skeleton was stamped on the My Mind's Eye Haunted "Halloween Checklist" paper and another was stamped on a separate piece of paper to cut out. Honestly, I'm pretty proud of this cutting. I have a lot of patience for this kind of fussy cutting in general, but the ribs on this guy really had me taking deep breaths. I decided before I started that I would try it only once. If I cut through or made a boo boo I couldn't fix or hide, I would not start another one. I'm happy with the results and really glad I had that patience.


Once he was cut out and all the edges were colored with a brown marker, I patted him on my Distress Ink embossing pad and sprinkled with clear embossing powder.

The vintage apothecary labels were printed on the computer and the edges were inked. The "A cure for what ails" letters were individually stamped and covered with Glossy Accents. The back is pretty simple - with more of the MME Haunted "Raven" paper and a fun pharmacy label with my info on it. The font was a free download (found ages ago...) called "Traveling_Typewriter".


Thanks so much for visiting today! Our Free For (F)All! challenge goes through midnight EST October 14th. Come join us - you could win a $20 gift voucher from The Beary Scrap!

Project Recipe

Image: TH Skeleton Stamp, vintage apothecary labels from Just Something I Made and Graphics Fairy
Paper: My Mind's Eye Haunted "Raven" and "Halloween Checklist"
Medium: Ranger Distress Ink in Vintage Photo; Glossy Accents; Ranger Distress Embossing Ink; Stampendous clear embossing powder
Embellishments: Dresden trim, black ribbon and TH tape from stash

Cheers,
Susan

Monday, June 27, 2011

TBS DT: Travelin' Teddy

Hi there crafty friends! Happy Monday to you. Before I chat up this week's project, I want to extend my heartfelt thanks to Guest Designer Brenda, who posted her last project this past Saturday. Sweetie, thank you so much for bringing such fun projects to our challenges. You and I have very different styles yet I learned something new from you almost every week over the last 3 months. It's been amazing to see what you design, and I am completely honest when I say you've taught me to think differently. Thanks Brenda!

This week the design team is continuing with our DIY embellishments to go along with our Do It Yourself Embellishment challenge. Seeing all the different embellishments by the design team last week was very inspiring to me!


For today's project I decided to make a mulberry paper "Tear Bear" as my DIY. It's been a looong time for me - at least a year! You may not know this, but Tear Bears are what brought me to The Beary Scrap in the first place. I was a novice bear maker and our very own Kimm was incredibly patient while I learned. I peppered her with a million questions and she answered every one of them with kindness. These days the Beary Sweet Designs acrylic patterns make it *so easy* to whip up a Tear Bear, and the written instructions HERE are brilliant.

I used the Tattered Teddy pattern on this card. Since Tattered Teddy came out, I've been playing around with the idea of making him slouch against a dress form die cut on a very shabby chic styled card. It turned out that my dress form die is too small for Teddy, so I went in a different direction with this project. (One day I will do it, but with the Baby Bear pattern instead.)

Here's Travelin' Teddy, working his way around the globe!


Card Recipe
Thanks for visiting today! Our DIY Embellishment challenge goes on through Thursday night - come play with us! You could win a $20 gift voucher to The Beary Scrap! Thursday is also the last day for Guest Designer Debbie. *sob* It's been a thrill to have both Debbie and Brenda with us for the last 3 months. I can't believe it's almost over. Ladies, thanks for all your wonderfully inspiring projects!

Cheers,
Susan

Monday, June 13, 2011

TBS DT: For The Birds

Hiya crafty friends! I hope you had a great weekend. We got rained out at a local minor league baseball game. It was a shame since the game had serious promise (1st- and 3rd-placed teams in the league). Anyway... I can hear your yawns, so I'll get on with my BSC #27 sketch sample. You still have a little time to get crackin' on an entry of your own and have a great chance to win a $20 gift voucher for The Beary Scrap! This sketch proved to be a bit challenging for some folks - are *you* up to the challenge?

For this project I relied on my My Mind's Eye Portobello Road paper and embellishment collection. I threw in a little Bazzill brown, distress ink and an assortment of adhesives. Seriously! All four of My Mind's Eye's Lost and Found collections are like one-stop-shopping for cardmakers!


Card Recipe
 I hope this can inspire you to join our Beary Sweet Sketch challenge - you have until Midnight tomorrow (Tuesday) to come and play!

Cheers,
Susan

Monday, May 23, 2011

TBS DT: Nature's Flutters

Hello hello and happy Monday to you! I hope you had a wonderful weekend. I had a birthday... and it was good. *wink*

So, this is Week 2 of our Beary Sweet Nature Challenge, where you can enter any project that you think conjures up "nature" in your noggin. As a bonus challenge to the design team, we have to include a charm in our project. Easy enough!

Kimm just got this fun filmstrip ribbon into the store, and I decided to use that as my jumping-off point. Here's what happened when it all landed:


Card Recipe
Thanks for visiting today! Come back all week for more great design team samples of our Nature theme. I hope you can enter our Beary Sweet Nature challenge, too. You could win a $20 voucher from The Beary Scrap!

Cheers,
Susan

Thursday, March 24, 2011

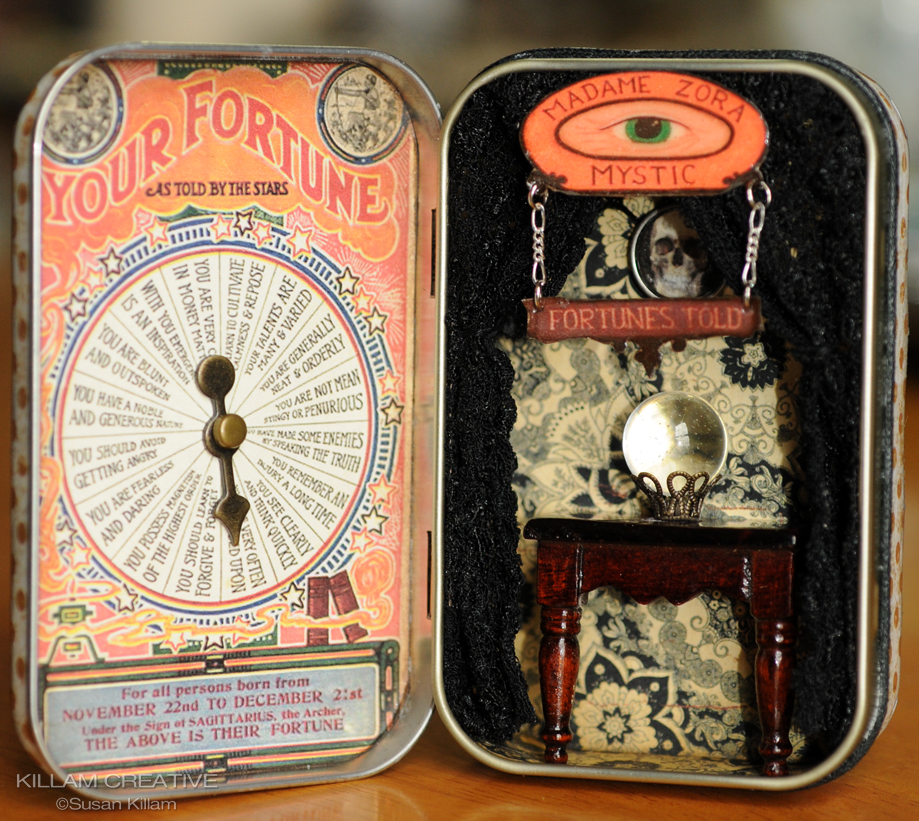
Oh-So-"Wicked Circus" Altered Altoid Tin

Hiya folks! So I'm hanging out at Craftster.org and ooh-ing and ahh-ing over some really cool craftiness. They have organized swaps all the time and I decided to take the plunge and participate in one. Ok, ok, so my fabulously talented sister might have had something to do with it. If not for her, I wouldn't have the nerve to play along. Thanks, big sis!

Anyway, the swap was to alter an Altoids tin using a "Wicked Circus" theme. My swap partner has received hers so I can post it here now.

The "Alexander" letters, crystal ball and skeleton hand are all layered.


Inside is a fortune telling wheel and the mystic's lair

I found a dollhouse table and cut to fit with a jeweler's saw. The crystal ball is an antique marble. No matter how much I worked it, I couldn't get Madame Zora's sign to hang straight.

Madame Zora is a fan of Alexander and has a poster hidden behind the curtain.


Kinda wicked, huh? I've got another one in the works with a vintage clown theme and I'll show it to you soon. Thanks for visiting!

Cheers,
Susan

Thursday, March 3, 2011

Altered Ancestors Book Swap, Part 2

Hi bloggers! I want share the next batch of little fat book swap pages. I've now completed 8 of the 11 and am feeling the mailing deadline looming down on me. Hee hee. Click here to see the first 4 if you missed 'em.

Muse
I'll admit this lovely lady isn't very altered. She has a crystal on her dress and a butterfly on her shoulder. I rubbed gold Ranger alcohol ink Mixative on the TH word tag. I was inspired by the very talented Laura Carson on this page.
Paris
I love this page! I set out to find an ancestor who evokes "travel" just so I could use this paper. The Paris ticket and "oh la la" were printed at home.

Hustler
You have to watch out for this con artist - she'll take the shirt off your back!

Drama Queen
"The theater, the theater. What happened to the theater?" This is a line Danny Kaye says in White Christmas. It's my least favorite part of my *most* favorite movie. Funny. The crown is a TH stamp that was embossed and cut out. "Art" is made of grungeboard from the Mixed Minis set. Using tweezers I rubbed the letters in a pool of Bundled Sage distress reinker. Impatiently I used a heat gun to dry with interesting results. The liquid evaporated, leaving a cool texture behind - almost like flocking. I'm going to play around with it some more. I finished the letters with Rock Candy distress paint (although next time I will use Glossy Accents since the crackle is minimum on the little letters. Live and learn!) 

So, for a little recap: Over at the All Things Tim Yahoo group I'm in an Altered Ancestors Little Fat Book swap. There are over 20 players and each of us makes 11 pages to send off to our swap coordinator. She then randomly picks pages to bind into little fat books and sends to the players. I don't even know if my book will include any of my own pages!

Each page is 4"x4" and the left side is for the binding rings. The photos were printed on a satin photo paper (just what I had on hand) and cut out. I rounded them for a little dimension and used a silicone as glue so they're all raised off the page a little. The pages are grunge paper with TH card stock attached on the front and back.


There they are! I have a few more days to finish up the last 3, then they get mailed off. This has been a huge project for me and I'll be happy when it's done. Yay!

Cheers,
Susan

Tuesday, February 22, 2011

Altered Ancestors Book Swap, Part 1

Hello blogging friends! I'm really excited to share a project with you, or at least parts of it. Over at the All Things Tim Yahoo group I'm in an Altered Ancestors Little Fat Book swap. There are over 20 players and each of us makes 11 pages to send off to our swap coordinator. She then randomly picks pages to bind into little fat books and sends to the players. I don't even know if my book will include any of my own pages!

Here are 4 of my pages - still have 7 to go, but they're in various states of unfinished-ness. *ahem* The idea is to use Tim Holtz products and alter old photographs.

At the Train Station
I love this one. The stamped image is a New York Central train schedule (or something like that). The pocket watch is made from Tim's Type Charms and a tiny clock face cut from one of his Lost & Found papers.

Bird's Nest
When I saw this image I immediately though her hair could host a nest. I futzed with a few different nest materials and eventually settled on this May Arts netting in two colors. The eggs are a vintage image covered in Glossy Accents. On this page the bird and paper are TH.

Angel
Such a little angel! I picked this paper then set out to find an image to work with it. There are tons of public domain vintage images online, but I fell in love with this little one. Her wings are made from elements found in the Mixed Mini's grungeboard pack. I painted first with pearl Lumiere paint then used a small paint brush dabbed on a Peeled Paint Distress Ink pad to sweep along the top half of the wing. I then added Rusty Hinge Distress Ink on the top 1/3 of the wing. I love the effect!

The "cloud" is vintage tatting and the Mixed Mini's grungeboard letters are colored first with a mustard-y alcohol ink then covered in German glass glitter. 

Use Your Imagination
This on is my second favorite... or maybe my first. I don't know! The wings are printed on Cryogen Irridescent paper and are sparkly in person. I used TH tissue tape and cut little letters from the Lost & Found paper pad.

So, the pages are 4"x4" and the left side is for the binding rings. The photos were printed on a satin photo paper (just what I had on hand) and cut out. I rounded them for a little dimension and used a silicone as glue so they're all raised off the page a little. The pages are grunge paper with TH card stock attached on the front and back. I'll show how I did the (very boring) back sides when I post more pages.

Thanks for visiting and reading this novel! If you're new 'round these parts be warned: I'm wordy and waffle a lot. If you are a regular visitor you're probably thinking you clicked on the wrong blog. What you're seeing is me growing as a mixed media artist. I hope you like! No worries, though - I'll still continue with my frou-frou vintage and Magnolias. I couldn't be "here" without them!

Cheers,
Susan

Monday, November 15, 2010

TBS DT: Jolly Old St. Nick

Hello hello blogging friends! i hope you had a spectacular weekend in your neck of the woods. Husband and I visited a dog show so we could stare at all the beautiful Dobe Boys and Girls. Ours runs more toward the Dobe Goof side of the breed family, and we love every bit of him. It is nice to see the ladies and gents, though. *wink*

After that I hunkered down in the studio. I managed to finish 2 cards from weeks ago and create today's card and a commissioned Philadelphia Flyers (professional ice hockey) card for a girl. I'm really pleased with it and will share here later this week.

Today kicks off a new Beary Sweet Challenge, and our theme is 
Anything Goes! 
Haha - I love this kind of challenge since it allows me complete freedom. Of course, this was a no-brainer for me since I started designing this card in my head waaay back when I first got my mitts on the My Mind's Eye Holly Jolly papers. With this challenge I was finally able to use it.


Santa is too delicious to be *just* a background element, don'tcha think? I had 2 of the same sheets and cut one Santa out. I painted him with Distress Crackle paint and layered him onto the second. Oh, I also I lightly inked the cut-out edges before painting with the crackle. I used Stickles on the holly and berries in his hat, too.

Here's a little note about Stickles - I have both the "Christmas Red" and "Gold" but find that "Candy Cane" and "Diamond" are much more suitable. When compared side by side, the former seem too bright.

The delightful ribbon is new to The Beary Scrap and I *love* it! I used 2 strips and wove gold embroidery thread through the centers. It was a bit of a brainstorm, and I'm really happy it hit me. I have tons of embroidery thread from years (er... decades?) ago that I've never used. Now it will be put to a good use! Yay!

The tag and tag holder thingy are Tim Holtz... stay tuned for TH products at TBS. *verybiggrin* The holly leaves (edged in Diamond Stickles) and red gems are from stash.

Challenges Entered
Card Recipe
  • Paper: My Mind's Eye Holly Jolly "Jolly Old St. Nick"; Bazzill Basics Mud Pie and (Dark Green)
  • Medium: Colorbox Fluid Chalk Ink in Chestnut Roan; Stickles in Diamond, Candy Cane, Green; Distress Crackle Paint in Rock Candy
  • Embellishments: Lace (available soon on the website); Embroidery floss, holly leaves, gems from stash
  • Adhesive: Scor-Tape, sewing machine
Thank you *so* much for visiting me today! I really hope you join our Anything Goes challenge at the Beary Scrap Design Team Blog - I'd love to see your projects!

Cheers,
Susan

Tuesday, June 1, 2010

CLP #26: June Sketch Challenge!

Hello hello! Can you believe it's June already? Wowzers, the year is flying by! Can someone press the pause button, please?

So with June 1 comes another fabulous sketch at the CLP Challenge Blog. Yay! I just lovelovelove Chelsea's sketches, don't you? This month is sponsored by the Digi Doodle Shop, and they very kindly let me use their Rooster image.


When I saw the rooster, I knew immediately that I wanted to use a paper pack from GCD Studios called Provence. "OH!", I thought to myself, "I can make a card in a French country theme with all the delicious papers in this poor, neglected pack."  

Mais, non. Il n'était pas possible. Les tendances étaient trop lumineux et en conflit avec le coq.

So I decided on Websters Pages paper and dug through the vintage embellishment bin and found bits and pieces that work. I still have a bit of French feel (er, ignore the tiny fact that the bingo card is from Springfield, Mass... 'k?) and the rooster pops on the card. Whoo hoo! Or is that cock-a-doodle-doo?


Sooo, as usual I've put the ol' Susan Spin on the sketch. Most importantly, I reinterpreted the background oval on each side of my main image. The right-side clock fills the round requirement easily, but the left side charm holder brad thingy is where the "spin" really occurs. It's round, ok? OK?! Heh, it's round and it's my spin... I crack me up! (Oh, and I promise you the raffia lace in the background is not crooked, even though it looks so in the photo.) 

Please take few minutes to visit the CLP Challenge Blog and see all the incredible samples from the Design Team. Y'know, I have to pinch myself each time I visit to prove that I'm not dreaming up my slot on the DT. They are such a wonderfully talented group of ladies!

The challenge runs through June 30 - I look forward to everyone's entries!


Other Fabby Challenges
Cheers,
Susan 

Tuesday, March 23, 2010

DZ Doodles DT - Inspiration Challenge

Hello hello hello! Today is the first "official" day of the new DZ Doodles Design Team. I'm so glad to be joining these wonderful ladies and playing around with Diane's images.

We're kicking off our first challenge with a delightfully Springy inspiration image:

This is where my creative juices flowed with this inspiration:

I'm in love with every one of Diane's flower images! As you probably know from my ramblings here and there, I'm a big fan of vintage and collage cards, and I've combined the two styles here for a sort of Vintage- and Collage-Lite card. Hee hee. :)

The sunflower is made of three layers, with some of the petals cut off for a 3D effect. Random edges have a little sparkle with Stickles glitter glue. The butterfly is a vintage image with little wire antennae!
And now, for all the important DZ Doodles Challenge details! Make your project using the above inspiration image and post it via Mr. Linky at the DZ Doodles Design Team blog no later than Monday, March 29th. The winner will be announced Wednesday, March 31 on the DT blog. You could win 2 DZ Doodles images! Yay! Be sure to check out all the fabulous DT offerings for this challenge for even more inspiration. :)

Challenges
My Card Recipe
  • Stamp: DZ Doodles Sunflower, from the Summertime Collection
  • Paper: Websters Pages "Soar Blue Skies" from Nature's Storybook, miscellaneous from stash
  • Medium: Prismacolor pencils, Stickles, Colorbox chalk ink
  • Embellishments: Vintage butterfly image with handmade wire antennae, a few pieces from K&Co's Ephemera Pack and the rest from my ever-growing collection of bits and bobs. *wink*
Thanks for stopping by - (and I really appreciate your comments *grin*)

Cheers,
Susan

Thursday, February 11, 2010

SSD Dare To Be Sassy Challenge!

Hiya friends! The snow just keeps coming here in Maryland. Living near the beach, I guess I should just imagine it's a whole lotta white sand, right? Can't quite figure out the sand in the trees, though... haha!

It's Dare to be Sassy Thursday, and today I have a Sassy Studio Design DT card for you. If you take on our challenge to make a project with a Sassy image, 3 hearts and loads of bling, you could win 2 Sassy Studio Designs images! Deadline to enter is 2/17, so hurry up and get Sassy!

I'm playing around, trying to find my "vintage style". If I'd thought ahead, I would have colored this lovely girl differently... buut I didn't. (I'm not keen on the blue shirt and may switch it out for another color - she's on pop-dots and easily removable...) *grin* I've had this floral Anna Griffin paper in my stash for a while. I absolutely love it! I machine-sewed the flat lace, scrunching it up while trying not to run a needle through my fingers. The three hearts were hand cut, balled up, flattened out (sort of) and then edges were inked. *Then* I decided I needed a little sparkle so I sprayed Glimmer Mist Pearl and then needed to ball them up again since the liquid flattened them out too much. *Again* with the planning ahead... :)

I really like the effect on the hearts. The pink paper is embossed with a Cuttlebug folder and spritzed with the same pearl Glimmer Mist. The polka dot paper is studded with sparkly Stickles.
Challenges
 Card Recipe
Stamp: Sassy Studio Designs "Giving Thanks" from the Fall Release
Paper: MME Bohemia Blossom Mi Amore, Anna Griffin rose, stash
Medium: Copic sketch for skin, Prismacolor pencils w/OMS and elbow grease, Glimmer Mist, Stickles
Embellishments: Surpisingly few! Lace from stash, Prima pearl flourish (cut up)

Tuesday, November 24, 2009

Quixotic Paperie Challenge #3

Hello! Thanks for stopping in today. This week's Quixotic Challenge theme is 'kraft and red", and I used kraft paper color rather than the paper itself. This is my first collage-type card, and I'm pleased with the result. Hope you like it!


Cheers!
Susan