Tuesday, November 13, 2018

Graphic 45 Tag Sampler

Hello crafty friends!  I'm on the Gypsy Soul Laser Cuts blog today.  I have to be honest, I started this Tags In A Box project without real focus.  I wanted to use scraps of Graphic 45 papers, things I prepared with fussy cutting or layering, yet never used. Once I started it, I quickly became underwhelmed by my efforts.  It was a good idea, but...  'meh' on execution.  It was way after midnight and I went to bed with 3 tag fronts laid out, thinking I was too far in to quit, but I needed to sleep on it.


In the morning over coffee, I wondered what I'd do with this project after it was completed.  Should I even continue?

Then I remembered Margo.  We met at a local monthly art & craft event.  My table that month held shadow boxes, embellished greeting cards, altered tins, and such.  We bonded over a love of Graphic 45 papers.  I see her every once in a while and each time we lament that we've never actually gotten together for crafty time.

Margo, this one's for you.  You breathed life into this project and gave it purpose.  Thank you.  I hope to see you at November's 3rd Friday!

****

Here is the base. You'll see I was rubbish at taking photos of the steps, but this should help a little.


The small piece in front allows you to display a tag without it sliding forward.  Pretty clever design, if you ask me.  The kit includes the base as well as 6 tags.  The tags are all roughly 4" x 8" and the box has a generous amount of room, so embellishments weren't a concern.

There's even an Extra Tag Set available if you want to fill it up!

I painted the inside black and covered the outside with Renaissance paper and black acrylic paint.


The tags were covered with background paper using Mod Podge.  The edges were sanded and then inked with brown marker and a foam pad.

Each tag was assembled with scraps of G45 and embellishments.  I used a small cut of gears from the Steampunk Frame to enhance the Steampunk Spells tag.  (Visible in the top photo.)  I used a mix of browns and black embossing powders on the gears.


Thanks for your visit today.

Cheers,
Susan


Gypsy Soul Laser Cuts Used
Tags In a Box Display #BD10A
Steampunk Frame #D20C

Wednesday, November 7, 2018

#Engage

Hi friends - Here's my latest project on the Gypsy Soul Laser Cuts blog, using the ATC Shrine Box.  Pop on over to see how I made it!


Thanks for your visit today!  --Susan

Gypsy Soul Laser Cuts Used


Monday, September 17, 2018

Apothecary Cabinet

Hello crafty friends! Today I'm sharing an apothecary cabinet made with one of the Gypsy Soul Laser Cuts' fabulous hinged boxes.  Come see the treasures inside!


This apothecary cabinet comes with a shelf for the center middle and a drawer for the center bottom -- I have left both of these out.  I glued the pieces together with white craft glue and allowed to dry.


I wanted the hinge holes set before I painted or papered (haven't decided which way to go yet).  I laid the hinges in place, marked the brad holes with a pencil, then used a tool to poke the holes.  I attached them to make sure the cabinet doors hung evenly, then removed for later use.


I measured the harlequin paper for the back center and painted all sides with black acrylic paint.


In this next photo I have attached the back harlequin paper and the door front/side papers.   This allowed me to attach the hinges permanently.  Now that it stands, I gathered bits and started the inside design.  During this, I realized I wanted to paper the insides.


The papers are cut and scored, but I added front door handle holes first.  (I didn't end up using the handles but was able to disguise the holes on the front with black Dresden trim.)


In this photo, I've added the inside papers with Mod Podge.  After that dried, I coated all sides with matte varnish.  Time to fill the shelves!


Front
The label on the tall bottle is a rub-on.  I carefully dabbed wet glue all over the glass bottle for a frosted effect.


Thanks for your visit today!  I hope you are inspired by all the designers over on the GSLC blog.

Gypsy Soul Laser Cuts Used
Apothecary Cabinet for Larger Bottles #C45AL

Other Supplies Used
White craft glue
Black acrylic paint
Designer scrapbook papers
Liquitex Varnish - Matte
Assorted bottles and bits
7 Gypsies labels rub-on
E-6000

Tuesday, August 14, 2018

"Study" Shadow Box

Hello crafty friends!  Over on the Gypsy Soul Laser Cuts blog today I have a peek into a curious person's study.  I don't know if a mad scientist lives here or just a collector of ... oddities.  I can only imagine what's tucked into corners all over the room!


Come visit to see the step-by-step for this box!

Cheers,
Susan

Tuesday, July 10, 2018

"His Collection" Shadow Box

Hello crafty friends!  Today on the Gypsy Soul Laser Cuts blog I have a masculine-themed shadow box to share with you!  I used the 3 Story House and packed it to the rafters with bits and pieces.  Visit the GSLC blog for all the details!


Thanks for your visit today!

Cheers,
Susan

Tuesday, June 12, 2018

Civic Duty Shadow Box

Hello crafty friends!  I have a civic-minded shadow box with you.  While we were clearing out the attic the other day Husband found a 70s-era patch that set the tone for this weeks project using the Arch Top Cabinet w/Doors (and feet -- really great feet) from Gypsy Soul Laser Cuts.

You'll see the patch at the bottom of the post.  For now, let me walk you through my construction.  Remember my crafty education team motto?  "I make the mistakes so you don't have to!"


Here all the parts laid out.  The dimensions when finished are 4" x 1 1/2" x 6 1/2" (10.16cm x 3.81cm x 16.51cm).


The first thing I did was to outline the body on my chosen paper.  I like to score corners rather than cut separate panels, but you can do that, too.  If you do one big piece like mine, leave extra on the side flaps to account for the corners.  See how there's more on the left edge (and barely more on the right)?  That's what I mean AND what you see here was barely enough.  While it's flat, outline the base arches, moving the left and right panels out a little first ( accounting for that scored corner).  Set this aside and do the same for the doors and front panel.


I picked out door knobs and poked a hole in the first door.  To match the second door, I laid the first onto the second and marked where the hole needed to be.  These doors are marked "front" and "back" in pencil, and -- even though you can't really see there are two doors here, they are stacked front-to-back-to-back-to-front.  It doesn't matter as much at this stage, but if paper or paint had already applied, I can guarantee I would have something upside down. ::shrug::


 I now have all my outer papers cut.  Notice I've penciled in the base arches but not cut.  I glued the top and bottom then the sides, and let it sit for a while.

Score the paper where you think the corners are.  This sounds scary, but you can score a little to the left or right of the original score lines if needed.  I had to adjust both and it didn't make a difference in the finished appearance.

Once the cabinet is dry enough to handle, double check the paper width before cutting out the base.  This is where I needed to adjust my score lines.  Cut out the center arch first, then check your pencil lines on the side arches and adjust as needed.  Once your arches are cut out, go ahead and glue the paper to the cabinet, starting with one side and wrapping around, making sure to flatten the paper as you go.  I like to use Mod Podge for these kinds of steps since it briefly allows me to nudge the paper a little if needed.

At this point leave the doors and front alone.


I applied black gesso to the inside, base, and top.  Later I painted the top outside and bottom outside with a mottled brown-black-red combo to mimic the door paper.


I used linen hinge tape to attach the doors to the frame.  I put as much as possible on the narrow frame and marked the spot.


Next I separated the tape from the backing and stuck it the the door; I reattached the backing to the little flap as I worked on the red door panel.

I don't have photos, but here's what I did: sanded the left edge of the paper at an angle to account for the hinging.  This was easier to do before attaching to the door because I didn't want to sand the linen tape.  I did the same for the right door, then attached the paper to the door panel.  I sanded the rest of the edges a bit and then inked all around.


Here is what it looked like at this stage.  Notice the doors fall in a bit - at the end I made door stops from the little dashes left from the laser cutting.  (I keep all of these "just in case").  In the future I'll add the door stops before the front panel is attached so they can be better aligned.


I let it dry overnight with the doors open.  The next day I sanded all the edges (and reinked as needed), then decorated.


Thanks for your visit today.  Please vote in your local elections as well as the big ones!

Cheers,
Susan

Gypsy Soul Laser Cuts Used
Arch Top Cabinet with Doors #D11B

Other Supplies Used
Tim Holtz Seasonal paper
Brown Dresden trim
Acrylic paints
Black gesso
Mod Podge
TH metal door knobs
Vintage photo
1970s fabric patch
Cheese cloth
Vintage brooch
Lineco Linen Hinge Tape

Tuesday, May 8, 2018

Boardwalk Diorama

Hi friends!  Over on the Gyspy Soul Laser Cuts blog I'm sharing scenes from beach vacations past using the Gypsy Soul Laser Cuts dimensional diorama.  Come on over to see how I made it!


Cheers,
Susan

Wednesday, March 21, 2018

Flights Of Fancy Necklace

Hello my friends!  Today I have a new vintage-inspired necklace and a story to share with you.  Quite a few yeas ago I was at the Philadelphia Beadfest and spent a little time chatting with Suzanne of A Grain Of Sand.  Not only did she have gorgeous vintage beads and clasps, but AGOS is the same town as family, so there was a bit of a 'connection'.  Since then I've kept up with the Facebook page and drooled over new stock posts about the famous Vintage Bead Hoard.


Last year Suzanne and team created a new Facebook group dedicated to jewelry designers who are inspired by the Miriam Haskell design house (1930s-present).  During the past year, I've been inspired by so many incredible pieces posted by designers from all over.  In January I decided to enter the AGOS 2nd Miriam Haskell Design Challenge - how exciting!


The entrants bought a challenge-specific assortment of vintage beads from AGOS and had a few weeks to design.  The top 3 winners received gift certificates to buy more great vintage stuff.  What could be better than that?

I entered... and I won grand prize!  Can you believe it?  I was surprised.  No really.  When you go to the FB page and see all the other entries, you'll be in awe, too.

This necklace was made with a cage work technique, meaning all components (except cabochons) are wired to the filigree base using a fine gauge wire.  This is a fiddly technique but oh-so-satisfying to make.  I feel like I'm carrying on an almost-lost tradition when I make this type of jewelry.


See the wee hummingbird on the flower?  That's Fancy, and this necklace is part of my Flights Of Fancy line.


Thanks for your visit today.

Cheers,
Susan

Tuesday, March 13, 2018

Travel Board Book/Album

Hi folks!  It's Susan, here to share the beginning of an ongoing project.  I used to make albums often, but got away from it for a while.  At some point I decided to use mini albums blanks as board books that tell a story - like the kid's books from years gone by.  (I have a very detailed Halloween one in the works!)

Today I want to share the beginnings of a travel mini album / board book, using the GSL Cuts staggered bracket edge mini album and elements from a couple different sets.


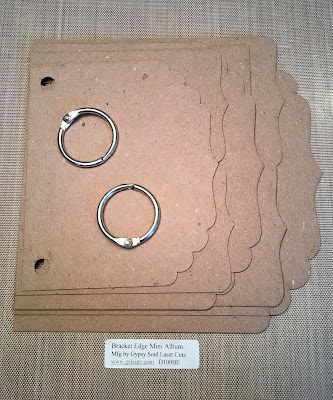
Here's the album.  See how pages 4 and 5 are set with brackets on top and bottom?  I accidentally put bot bracelets on the bottom (see above).  No worries, though - it still works!


The first thing I did was to choose the paper for each page.  I used IOD "Gallivant" since it has a vintage travel theme.  Number the pages 1, 2, 3, etc and note which side is the front to make sure you don't accidentally flip a page while gluing the paper (like me).


I outlined the album pages onto the paper design and cut by hand.


The papers were attached using Mod Podge, and I set a heavy object on them the keep them flat while drying.


Fine and extra-fine sandpaper cleaned up the edges.


Ink and a brown pen gave the edges a vintage look.


I was recently talking with another education team member about embossing powders.  I figured this would be a good project to use them again.  First I prepped the laser cuts I wanted to use.  This travel word is from the small Chevron Words travel set. Other words in the set are journey, adventure, and destination.  I'll end up using all of them in this book.

Since I only wanted the word, I snipped off the chevron parts.  Travel was eventually embossed with browns and landed on the album front.


Next I wanted to add a little color without painting.  I used blue Prismacolor pencil and layered a little brown on top.  This was a total experiment!


Embossing ink and clear powder added, and voilà, it worked!  I added more ink and powder to the cut-out Steampunk Frame balloon basket to fill in.


This banner strip got the same blue pencil/embossing powder treatment as the balloon.  Here I'm gluing it to the front page.  From here I continued embellishing the front and first two pages.  I'll continue the project in the next few weeks!


Here is a view of the embossed balloon, compass rose, and medium size tudor rose.


Thanks for your visit today!

Cheers,
Susan

GSL Cuts Used
Bracket Edge Mini Album #D100BE
Banner Border Strips D34D
Chevron Words Travel Small C71
Steampunk Frame D20C
Compass Rose D61B
Tudor Rose Singles D6Q

Other Supplies Used
Iron Orchid Designs "Galivant"
Brown ink
Brown marker
Embossing ink
Embossing powder  - clear, fine clear, brown blend
Prismacolor pencils - Copenhagen Blue, Sepia
Mod Podge
Vintage tatting
Cheese cloth