Showing posts with label prismacolor pencils. Show all posts

Saturday, September 21, 2013

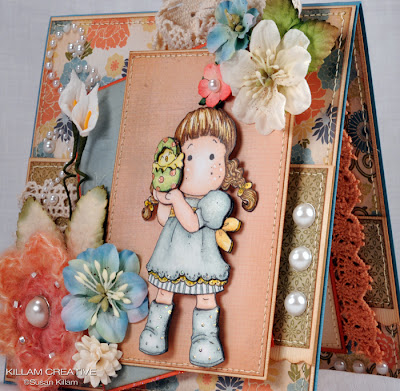
Tilda's Ice Cream Cone

Hiya folks! We've had gorgeous weather here on the East Coast that's been leaning a bit toward crisp fall temperatures. I'm not quite ready for the cold so I'm going to imagine hot sunshine for an excuse to enjoy a yummy ice cream cone with Tilda!


These vibrant colors are found on Bo Bunny's "Vicky B" collection. I love the brightness of orange, pink and lime!


This sweet Magnolia Tilda was colored with Prismacolor pencils and layered up for that 3D effect. The crochet flower -a gift from a dear friend- adds a great touch of texture. You can imagine the butterfly and ladybug charms coming to life and flitting around this lovely little garden!


An extension of the "garden" is found inside along with an area for a sweet sentiment!

Thanks for stopping by today. I hope you have a gorgeous day!

Cheers,
Susan

Friday, September 20, 2013

Sweet Anniversary Music Card

Hi folks! Today is our 16th wedding anniversary and I'm still deeply in love with The Man. Awww....

Instead of loading up even more sappy stuffs, I'll share this sweet little Tilda with you.

 
The paper is My Mind's Eye "Indie Chic: Citron" with Bazzill solids. This MME collection has one of my favorite color combinations of teal and coral. The music notes are washi tape glued to card stock and then rounded here and there to show movement.


Tilda was colored with Prismacolor pencils and layered for a 3D effect - even the wings are layered! I used another Willow Folk crochet flower (as on yesterday's card) but the cards were actually made weeks apart. :-)


The inside coordinates with the front - I just love love love this swirly floral paper!

Tonight were off to a lovely dinner and a little sweet music of our own. *blush* I hope everyone has a fantastic loving weekend!

Cheers,
Susan

Sunday, April 7, 2013

Happy Winnings and the Last Easter Card

Hello hello! We worked in the yard today and are all tired and happy this evening. I hope your weekend was great!

Last week I was lucky enough to win a prize over at the oh-so-inspiring Linda Cain's blog, FRIENDS in ART. I expected to receive the Retro Cafe Art Theater Shrine kit and was spoiled to receive so many goodies! Here's the photo she posted - I'm too excited to make my own photo at the moment!


Thanks so much, Linda!

I also want to show you my final Easter card of the year. When I made this card for someone, I also made a blank for myself, as a way to use up paper and add more to the shop. All the important info is on that post, so I'll let you wander over there if you are so inspired. :)


I bought this stamp specifically for that large Easter card order and I'm so glad I did. I adore her hat so much!

Thanks for visiting today! Tomorrow I'll take you to the beach with Graphic 45!

Cheers,
Susan

Tuesday, April 2, 2013

The Best Laid Plans of Mice and Men...

...Often go astray.    (Thank you, Robert Burns)

Hello hello! How about another Easter-themed card? I wanted to share all of them before Easter, but, you know, life got in the way. *wink*


This is made with Bo Bunny's Vicky B paper pad. Lovely bright colors! Looks like Tilda is having fun painting all the eggs.


The stripey panel on the right is permanent - it doesn't pull out or anything. I'm not sure what I was thinking except I knew I wanted to see the stripes. As a result, I had to make the gift box rectangular instead of square. No big deal!


I'm not sure if you can see the glossy effect on the top left circle panels (front and inside). I covered the circles with Glossy Accents and set coordinating Dew Drops (remember those?) in the wet GA. It's a neat effect!


Thanks for visiting today. I'll try to share all Easter cards this week -- two left on the computer and more still on the camera. Yikes! Anyway, fun fun fun!

Cheers,
Susan

Thursday, March 28, 2013

Tilda and her Lamb

Hello hello! Is it Easter yet? No? Good, since I still have 4 more Easter cards to share with you. Phew!


How pretty is this little one? She's taking her favorite lamb for a walk and she just might be passing your house right now. :)


I used Basic Grey's Marjolaine 6x6 pad for this card and it's matching gift box. I can't get enough of the blue-green combination and this pad has (had!) some really nice ones.


Tilda and Lambie are layered and popped off the page. Flowers are Prima, Recollections, Wild Orchid and my wholesalers. Love all the flowers!


Thanks for visiting today!

Cheers,
Susan

Monday, March 18, 2013

Tilda's Collection of Easter Eggs

Hello folks! Easter is coming up and Tilda already has a collection of eggs, ready to hide for her friends. The papers on this card are Pion Design's "Fairytale of Spring".


Tilda is colored with Faber-Castell's yummy Albrecht Durer watercolor pencils. I'll be using these a lot more! The bench is color with Prismacolor pencils (still a favorite!).

There's a tag tucked in on the right side, with loads of flowers to pull the tag out.


Large panel for Happy Easter wishes!

The card and matching gift box set

Thanks for visiting today! I have a few more Easter cards to share over the next week or two. Yay!

Cheers,
Susan

Tuesday, March 12, 2013

Magnolia's Tilda With An Easter Lamb

Hello hello! More Easter and more Tilda cuteness coming at you today. :)


I used two Magnolia stamps for this card, standing Tilda in front of an open gate. I love this card and it might be my favorite of all the Easter cards... or maybe the next one I post will be! Hahaha.

I used the last bits of my Graphic 45 Once Upon A Springtime papers and loads of lovely Prima and Wild Orchid Crafts flowers.  The seam binding is threaded through a vintage mother of pearl button from my collection.


Tilda, the sweet little lamb and even the fence and flowers are layered for a 3 dimensional effect. Everything is colored with Prismacolor pencils and blended with OMS.


Here's the coordinating inside panel.


Thanks for visiting today! I hope you have a creative day.

Cheers,
Susan

Friday, March 1, 2013

Magnolia's Tilda with the Easter Bunny!

Hiya crafty friends! I have another Easter card to share with you today. I've been having fun making these little ladies!


I think this Tilda is my all-time favorite because of her hat. I want a hat just like hers. :) See the pearl brad on the coral flower? I thought it looked a little too formal, so I put bisque Liquid Pearls dots on it - now it's fun!


I also used a Magnolia tree stamp and make it into a cherry tree to complement the cherry design on the base layer. Funny that the cherries are barely visible on the finished card. Ha!


Tilda, bunny and tree are all cut out and layered. The plaid lines on the pants were done with a Copic Multiliner pen, and everything was colored with Prismacolor pencils. Papers are all from the My Mind's Eye Fine & Dandy Tickled Pink collection. It's perfectly springy!

Thanks for visiting today. I hope you have a grand day!

Cheers,
Susan

Tuesday, February 26, 2013

Tilda's Easter Chick

Hi crafty friends! I've been working on Magnolia Easter cards lately and want to share one with you today.


I used My Mind's Eye's Indie Chic 6x6 papers, Prima and Petaloo paper flowers and a gorgeous hand crocheted flower from Willow Folk.


Tilda and her little chick are layered and pop off the card front. She's quite proud of her little friend!


Here's a detail from the inside of the card, with another layered chick. So cute!


Thanks for stopping in today! I have more Easter cards to share over the next few weeks, so check back for more Magnolia cuteness!

Cheers,
Susan

Monday, July 4, 2011

TBS DT: Sketch and Christmas in July

Hello crafty friends! I hope all our American readers are having fabulous Independence Day celebrations. Today we celebrate the adoption of the Declaration of Independence.  July 4, 1776 was a monumental day in the history of the newly formed United States of America. Today we celebrate with parties, fireworks and pools. It's one big birthday party for the nation. Happy birthday!

So, with that said... at The Beary Scrap we're in the midst of our July Sketch Challenge. The design team is shaking it up a bit by adding a Christmas in July theme to our projects. Notice how that happens to go with our Christmas in July blog candy? Hey, we planned it right!

Of course, I'm ignoring the fact that I'm posting a Christmas card on July 4th...  but can't red and green be considered national colors, too? *grin*


This is Magnolia's "Tilda with Fir" and happens to be the stamp included with our challenge blog candy. Isn't she adorable? This is a pretty simple card made with papers that really seemed to do the designing work for me. They are from a Webster's Pages 6x6 pack. See the background paper? I used the front of the stack for this layer. Underneath the plaid layer is the "petit papers" logo - it's like getting an extra sheet in an already fabulous paper pad!

Card Recipe
Thanks so much for visiting today! Please join our Beary Sweet Sketch Challenge - all entries are eligible to win our blog candy as well as the $20 gift voucher! It goes on through July 14th - I hope to see *your* fun projects!

Cheers,
Susan

Monday, May 2, 2011

TBS DT: Tilda Jumps for Joy!

Hello crafty friends! It's Monday after a busy gardening weekend, which means I'm feeling achy but good after all that weeding. Phew! Who knew some weeds just don't die over the winter? I've got this wicked grassy stuff that sends out runners and .... oh my, you don't need to hear about my herb bed woes. Let's take a look at this week's Beary Scrap Design Team card, then! *So* much more fun.

We have a new sketch challenge for you, and I was inspired to color up a Magnolia stamp. I *know*! It's been a long time, but Tilda doesn't seem to be bothered - she's jumping for joy!


I layered her up and used copious amounts of Star Dust Stickles. The papers are the fun and springy Old World Cabbage Stew from Jillibean Soup. The butterflies are vintage images printed and cut out - I added wire antennae and Stickles for a little more detail. The pins are homemade.

Our Beary Sweet Sketch challenge goes on through May 14 - we'd love to see your entries based on this sketch. C'mon over and play!


Card Recipe
Challenges, Please [Wow! I haven't been able to enter so many in AGES! Thanks for your consideration!]


Thanks for visiting me today! I hope you enjoyed my Tilda, too.

Cheers,
Susan

Monday, November 29, 2010

TBS DT: Anything Goes with Wrapped Tilda

Hello hello! Here we are at the end of The Beary Sweet Challenge #14: Anything Goes - tomorrow is the last day to enter your fabulous creations. Hurry HERE to enter for your chance to win a $20 gift voucher to The Beary Scrap!

Ok, so my last project for Anything Goes is a very simple Magnolia using Basic Grey "Eskimo Kisses". Don't you just love the colors?


The paper behind Wrapped Tilda is a glitter paper from my stash. I just love it because the glitter is embedded in the paper, with a clear coating over it. I embossed the holly paper with Cuttlebug dots and the light paper strip on the left with Cuttlebug swirls. I then used Star Dust Stickles on the swirls to enhance them.

Challenges
Card Recipe
Thanks for visiting today!

Cheers,
Susan

Monday, November 22, 2010

TBS DT: Anything Goes with a Banner

I'm thrilled that this sweet little Tilda is a Top 3 winner at Die Cut Dreams Christmas Challenge blog! Thanks so much!


This card was featured at the Little Red Wagon's Banner challenge. :) Thanks ladies!


Hello hello! This week the Beary Scrap design team continues with our BSC #14 "Anything Goes" samples, but with a twist! Our task is to jump on the banner bandwagon and include some kind of banner in our project.

Don't you just love the My Mind's Eye Holly Jolly line? This particular paper inspired me to create an outdoors scene. Here, darling Tilda is sitting on her bench, wishing for... more snow? Peace on earth? Pants? I'm not completely sure what's on her mind, but she's awfully cute anyway!


Both Tilda and her bench are colored with a combination of Copics and Prismacolor pencils with OMS. Her coat is covered with flocking powder to create a velvet texture. this is the first time I've tried flocking, and I like it!

The paper is dotted with Diamond Stickles. I've used a few different Stickles colors throughout: Star Dust (boot laces, accenting the Candy Cane Stickles on mitten, scarf, hair bows); Crystal (holly leaves); Diamond ("merry", branches paper, medallion); Frosted Lace (socks and hat); Candy Cane (coat trim, hair bows, scarf, hat). Phew! Is that all?

I created the "merry" banner and "bright" medallion on the computer. I really wanted the letters to look like they were hanging from the branch... It didn't turn out as well as the design in my mind, but it's still cute. :)

Challenges, Please :)
Card Recipe
  • Stamp: Magnolia
  • Paper: Bazzill Mud Pie; My Mind's Eye Holly Jolly - both sides of "Winter Branch"
  • Medium: Copics; Stickles (see list above); Prismacolor pencils with OMS; ColorBox Fluid Chalk in Chestnut Roan; DecoArt Snow Writer (at base of bench)
  • Embellishments: Holly Jolly trim pack; pins from stash; Holly leaves cut from Cricut; Prima felt branch
  • Adhesive: Glue Dots 1/8"; Scor-Tape; silicone
Thanks so much for stopping in! Our Beary Sweet Challenge #14 - Anything Goes! - can be found HERE. Please take a minute and join in the fun - you could win $20 voucher from The Beary Scrap!

Cheers,
Susan

Thursday, November 18, 2010

Philadelphia Flyers and Layering Chalk Ink

Update 11/22/10: This card has been entered at Make It Monday Linky Party for a possible weekly feature at Michelle's Pink Paper Paradise blog. In Michelle's words: "Its a great way to showcase your favourite card or project to new people. You can even revive an old post. So come along link up and check out the other submissions and remember is all about just sharing the creativity and you may even find yourself making some new blog buddies." How great is that? Thanks Michelle!


Hello crafty friends! We made it over the hump (day). Yay! Today I want to share the last of a series of birthday cards made for a dear friend to give to her granddaughters. I have loved the work, but admit it was challenging, too. Generally, my cards are made to tickle my own fancy. These cards were made for specific teen girls whom I've never met but know a little about.

The most important thing I needed to know about Tiana is that she "bleeds Flyers orange". For a while I had no idea how to translate this onto a card ... until Kenny K released his All-Starz line. Hello Hockey Girl! I used Kenny K's images for the twins in July and the first November birthday. Kenny K has been very good to me and he doesn't even know it!


The ticket is my own design (duh) and the numbers are Tiana's birthday and age. I thought this was clever... *ahem* Susan=Dork.

What's up with the pennant, you ask? Weeelll, about 10 years ago I made this huge, wonderful Washington Redskins banner for friends. Each colored piece was hand-cut and layered from felt. I wish I had a good detail photo - sorry.


Then I made a Baltimore Ravens one for my husband, which I don't seem to have a photo of... (although it's hanging in the attic so I could show you if you want to make your own). This is a long way around to tell you sports teams and felt are in my blood. Ha! I figured since I could make these banners, why not a little pennant for the Flyers? Well , let me tell you, there's a biiig difference between a 30" x 40" banner and a 2" pennant. *sheesh* I am the queen of biting off more than I can chew! It worked out, though. I think it's cute, if obviously hand-cut! *grin*

Anyway, Hockey Girl is layered twice - the hat, left arm and left leg are all popped up. It kinda makes her a little more sassy, don'tcha think?


Oh, I wanted to share an example of layering chalk inks. I've talked about it before, and remembered to snap it in progress so you could see what I've been blathering on about. 

I first "edged" the paper in orange chalk, but it seemed too orange, so I added a little dark brown to the very edge and over the orange a little. 


See? The orange peeks through but has a little dimension now. That's the great thing about chalk inks - you can layer!


So here's the finished card with gift box. Honestly, I'm a little sad that it's all over. Julia, thank you *so* much for your friendship and your trust. You haven't seen this last card yet, so I hope with all my heart it makes you happy.


Challenges Entered
Card Recipe
  • Digital Stamp: "Hockey Girl" from Kenny K Downloads
  • Paper: Bazzill Basics in Mud Pie and Navel; Basic Grey Ambrosia in Tangy, Quince and Fresh Squeezed for the envelope
  • Medium: Copics for skin; Prismacolor pencils with OMS; Stickles in Icicle, Spiced Marmalade, Star Dust; Versa Magic chalk ink in Orange Spice and Jumbo Java
  • Embellishments: Kaisercraft Pearls; Ivory satin and sheer ribbons from stash; Mulberry flowers from Prima and The Beary Scrap; Pins from Grandma
  • Tools: Scor-Pal; Cutter Bee scissors; sewing machine; printer
  • Adhesives: Scor-Tape; Silicone glue; Glue Dots - I'm really liking these 1/8" ones in place of the normal foam dots I use. I suspect the foam dots don't stay on as long. I know heat affects them.
So,  there you have it! Thanks for stopping in today.

Cheers,
Susan

Monday, November 8, 2010

TBS DT: Thankful For You

Hello friends! Hope you had a great weekend. We had a little family gathering to celebrate Grandma's 89th birthday. Now my wonderful in-laws are visiting and doing a little granddog sitting while Husband and I have a wee midweek fling in Philadelphia. *grin*

This week the design team is using the BSC #13 sketch with a little added challenge just for us: Apple, Pear, Pumpkin. This is open to interpretation and could be the foods themselves, their colors, or a combination of the two. Or even something I can't think of right now. :) See? It's all open to interpretation *and* imagination... 

I had a little problem at first... 'specially since I'm dying to use my new Christmas papers which have nothing to do with apples, pears or pumpkins. I poked around my paper bins and found the awesome Pink Paislee 365°. Of course, it's absolutely perfect so I opted for "sketch plus colors".


You'll notice I barely layered on this one. *gasp* I was unsure about a green dress so I figured I'd try it on the bottom layer first. (Normally I don't completely color the bottom layer - just the edges.) It turned out so well that I decided to use it.


Card Recipe
  • Stamp - Magnolia
  • Paper - Bazzill Basics in Mud Pie; Pink Paislee 365° 6x6 pad and "Be Free" (stripes) in 12x12
  • Medium - Copic E0000, E01, E11 for skin; Prismacolor pencils with OMS; Colorbox Fluid Chalk in Chestnut Roan and Creamy Brown; Stickles Crystal and Diamond; Distress Stickles in Spiced Marmalade
  • Embellishments - Kaisercraft Pearls in Snow; May Arts Crocheted Lace (brand new in store - call to order); Satin ribbon (large and woven into lace) from stash; ticket - my design and Kimm's sentiment (thanks a bunch!)
  • Tools - Scor-Pal; Cuttlebug Embossing Folders
  • Adhesives - Scor-Tape and 1/8" Glue Dots
Hope you can find inspiration from this... and while you're feeling so inspired *grin*, please join our Beary Sweet Sketch Challenge! It's going on now through November 14th. See you there!

Cheers,
Susan

Monday, November 1, 2010

CLP #31 Sketch

Please scroll down for my Beary Scrap Challenge #13! I will announcee my Inking Pink Blog Hop winner tomorrow - thanks so much for hopping along with us!


It's November 1st and time for another Crafting Life's Pieces Sketch Challenge! Yay! We have another gorgeous sketch and fabulous samples from the design team. I love working with these talented ladies! Please be sure to check them out HERE. :)


 I used the delightful Puppy Post - isn't he the cutest little guy? the papers are Bazzill solids and Basic Gray Wassail. I received the stamp digitally (they are unmounted rubber stamps in the store) and printed on the new Copic X-Press. I'll write more in it another time, but just know that I LOVE it with my Prismacolor pencils and OMS. Oh yea, it works with Copics, too. Haha!

He is layered - #1 is the full image, #2 is the post box (to give it a rounded effect) and the puppy, and layer #3 is the ears and letter. I used silicone glue in between the layers. 


And here is Chelsea's beautiful CLP Challenge sketch. I hope you can use it and join our challenge!


This month we're sponsored by Lili of the Valley, a UK Company which has a simply gorgeous range of unique un-mounted rubber stamps. The winner will be getting a £10 gift voucher to spend at Lili of the Valley.

Come join us!

Cheers,
Susan