Showing posts with label mini album. Show all posts

Wednesday, June 19, 2019

Atelier: Mini Sewing-Themed Album

Hello creative friends!  I have an Alpha Stamps project to share with you today, made with gorgeous paper and a wee 4-inch chipboard album.

There's a feeling of nostalgia and comfort that comes from vintage sewing artifacts and ephemera.  I've collected enough bits and bobs over the years to have a vintage-sewing-themed guest bedroom, including an old singer treadle machine as a side table.

I was thrilled to see Stamperia's Atelier paper pad, a beautiful nod to seamstresses everywhere.  I couldn't wait to work with it.

Don't get me wrong - I am NOT a seamstress.  Funny story - when we lived in Pennsylvania, my husband and I hosted an annual Christmas party for a few neighbor friends.  There were a total of 4 couples and we did a funny gift exchange.  One year I made fleece pajama pants for everyone.  We had the weekend morning habit of wandering to someone's house for porch coffee -- usually in pajamas --  so I bought a pattern and matched the fleece designs to their personalities as best I could.  I sewed for months.  I was relieved when the last pair was finished, and tickled when everyone put them on at the party.  Needless to say, I haven't made a garment again.  It was fun to walk out my door and see those jim-jams that winter, though.

I mostly use my sewing machine on paper now, as you can see on each page of this tiny album. 


I loved working with this Memory Hardware Tiny Chipboard Album.  Leslie, our fearless Alpha Stamps leader, knew I wanted to embellish the heck out of this paper so she searched high and low for the perfect base.  Thanks Leslie!


The spine is white sticky canvas with a few coats of matte varnish to give it more structure and keep from fraying.  I supplemented the sticky back with white glue, just in case...


Let's take a peek inside!


The dress form on the right is great on it's own, so I only outlined it with a silver star jelly roll pen to give it a little sparkle.


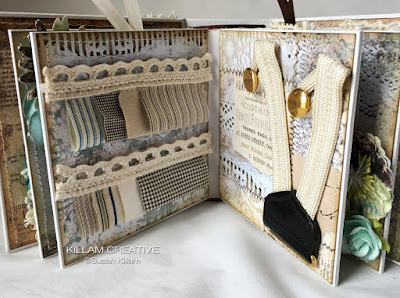
Once they can no longer be worn, my husband gives me his old silk suspenders to reuse.  The collection of fabric "shirting" samples are actually very old quilt blocks that came in a large vintage sewing auction lot I won a few months ago.  These are my favorite pages of the whole album.


This is a small sampler of crochet laces.  I found the celluloid thread cutter in that auction box, also.


The dress form and thread top are just a few in the Atelier paper pad.  I wrapped brown ribbon around the waist and sewed a blue button with a lace scrap onto it.


A few notes on construction.  I painted the album edges white, and added linen hinging tape between each page to give a fabric-y look without adding any bulk.  It coordinates with the white canvas I used on the spine.


To help pick out a specific part of a paper design, I cut a piece of acetate to fit my item (in this case, the front and back covers), then hovered it over different designs until I find the perfect one.  After the outside was done, I trimmed the acetate to fit the pages, then set it aside for the next project.


There is a fair amount of hand sewing here, including the large mother-of-pearl button closure.  I punched two holes in the chipboard before covering with papers and added the button at the end.  That message was appropriate since I poked my fingers a few times... ouch.


The suspenders were added before the page was attached to the book.  I sewed the buttons on and attached the suspenders part with a zig-zag stitch mirroring the one on the fabric.


The dress form charm dangles on a sturdy eye pin from the jewelry section of a craft store.  I used cream seam binding for the closure.  The other end is glued between the inside back cover paper and the chipboard. 


Thanks for your visit today!  A complete Alpha Stamps supply list for this project can be found HERE!

Cheers
Susan

Tuesday, March 13, 2018

Travel Board Book/Album

Hi folks!  It's Susan, here to share the beginning of an ongoing project.  I used to make albums often, but got away from it for a while.  At some point I decided to use mini albums blanks as board books that tell a story - like the kid's books from years gone by.  (I have a very detailed Halloween one in the works!)

Today I want to share the beginnings of a travel mini album / board book, using the GSL Cuts staggered bracket edge mini album and elements from a couple different sets.


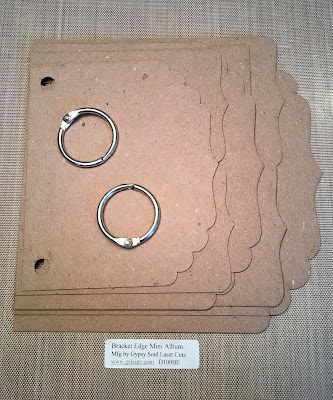
Here's the album.  See how pages 4 and 5 are set with brackets on top and bottom?  I accidentally put bot bracelets on the bottom (see above).  No worries, though - it still works!


The first thing I did was to choose the paper for each page.  I used IOD "Gallivant" since it has a vintage travel theme.  Number the pages 1, 2, 3, etc and note which side is the front to make sure you don't accidentally flip a page while gluing the paper (like me).


I outlined the album pages onto the paper design and cut by hand.


The papers were attached using Mod Podge, and I set a heavy object on them the keep them flat while drying.


Fine and extra-fine sandpaper cleaned up the edges.


Ink and a brown pen gave the edges a vintage look.


I was recently talking with another education team member about embossing powders.  I figured this would be a good project to use them again.  First I prepped the laser cuts I wanted to use.  This travel word is from the small Chevron Words travel set. Other words in the set are journey, adventure, and destination.  I'll end up using all of them in this book.

Since I only wanted the word, I snipped off the chevron parts.  Travel was eventually embossed with browns and landed on the album front.


Next I wanted to add a little color without painting.  I used blue Prismacolor pencil and layered a little brown on top.  This was a total experiment!


Embossing ink and clear powder added, and voilĂ , it worked!  I added more ink and powder to the cut-out Steampunk Frame balloon basket to fill in.


This banner strip got the same blue pencil/embossing powder treatment as the balloon.  Here I'm gluing it to the front page.  From here I continued embellishing the front and first two pages.  I'll continue the project in the next few weeks!


Here is a view of the embossed balloon, compass rose, and medium size tudor rose.


Thanks for your visit today!

Cheers,
Susan

GSL Cuts Used
Bracket Edge Mini Album #D100BE
Banner Border Strips D34D
Chevron Words Travel Small C71
Steampunk Frame D20C
Compass Rose D61B
Tudor Rose Singles D6Q

Other Supplies Used
Iron Orchid Designs "Galivant"
Brown ink
Brown marker
Embossing ink
Embossing powder  - clear, fine clear, brown blend
Prismacolor pencils - Copenhagen Blue, Sepia
Mod Podge
Vintage tatting
Cheese cloth

Saturday, March 4, 2017

Custom "Baby's Firsts" Mini Album

Hello crafty friends!

I have a great customer who orders cards throughout the year.  For Christmas she came up with the brilliant idea for an album of card fronts.  She wanted to celebrate a new baby in the family as well as that sweet baby's firsts, which happened quickly after she was born.

The album is 3 pages.  I will send a baptism page for the album soon EDIT: the baptism page is included below!  Who knows -- there might even be a 1st birthday page later.  I love this album idea!

This is the front page. Can you see the tag on the right side? It holds a sweet personalized sentiment.


Multi layered

Baby's first Thanksgiving!


The left  side of each page coordinates with the theme.


Baby's first Christmas. This one kind of knocks even my socks off! It was a lot of time consuming work but also the most fun to design and see finished.


The "First" is red Stickles under a layer of Glossy Accents.
It shows better in person!


All Graphic 45 papers, of course. If I could buy up every unused Santa scene page in all the closets across the world, I would. It's perfect.

This baptism page was shipped yesterday!


Thanks for visiting today.

Cheers,
Susan

Tuesday, October 6, 2015

An Eerie Tale Halloween Album (Image Heavy)

Hi folks! I have a wonderful Halloween album to share with you today. I *know* I said I want to move away from albums but I still have so many prepackaged album blanks on hand and entirely too much paper. Wait, did I say that out loud? Goodness! We'll just have to pretend I didn't say that...

Speaking of album blanks, I found a great price on the old Bo Bunny "My Word" cascading albums. Because I always have to justify shipping charges, I bought 5. This is my first one.


It's made using Graphic 45's An Eerie Tale. It took up 99% of a 12x12 pad. I love how this one turned out and can't wait for it to find a new home and life breathed into it with family photos.

There are 7 individual chipboard pages instead of the original 6. I also used the chipboard packaging sheet. It was the right size! The album -- with rings -- is 14" long and 6" wide.

There are 22 single panels, 15 folded panels and 4 tags. There is quite a lot of room for family Halloween fun!

Click the photos for larger images!

Pages 2 and 3

3 of the folded panels are found on these pages

Pages 4 and 5

Panels and tag on pages 4 and 5

Pages 6 and 7

Inside pages 6 and 7

Pages 8 and 9

Details on 8 and 9 -- can you see the spider below the chipboard web?

Pages 10 and 11

Inside the pockets of 10 and 11

Pages 12 and 13

Details of 12 and 13

The album's back cover


Thanks for stopping in today! This album is available for purchase in my Killam Creative Paper shop. It will bring you YEARS of fun! If you have any questions about the album, feel free to send an email at the link on the right, or through my shop.

Cheers,
susan