Showing posts with label Alpha Stamps. Show all posts

Saturday, October 26, 2019

Around the Skellie Neighborhood

Hello crafty friends!  I'm here today to share my latest Halloween-themed Alpha Stamps project. As you know, October's kit is Twilight, and I've used the fantastic Twilight papers found there to create this glimpse into the everyday life of The Skellingtons.  Come take a walk down the lane with me!

I've used linen hinging tape painted black to bind the houses together, and bits and pieces of the twilight papers to bring the houses to life.
Dresden trim of all sorts as well as gold paint highlight the roof lines.
The skeletons are fussy cut and adhered with white adhesive foam.  There are two layers of foam on a few to pop them up more than their companions.

To see all my Alpha Stamps used for the neighborhood, please visit my source list HERE.  Thanks for your visit today!  

Cheers,
Susan


Saturday, August 17, 2019

Edgar Allan Poe Tunnel Shadow Box

Hello crafty friends!  I'm here today to share a new project made with elements from the Alpha Stamps August Kit:  Tunnel Book!

The kit comes with great seasonal papers and timely sunflowers, but my 4x4 Arch Tunnel Book is a little darker with an Edgar Allan Poe theme.  Hey, I'm a Baltimore girl and I can't pass up a Poe project opportunity!


The design team will show you different ways to use the tunnel. I made mine into a shadow box.

To begin, I chose the center element first.  This photo shows how I rigged it up so I could see the chipboard layers and plan the elements.  (Note to self: put wee lights in the next tunnel book.)


I painted all pieces with black gesso, then decided to cover with papers.  The easiest for me was to paint the adhesive onto the tunnel panels, then put that onto the paper and allow to dry.


I cut the centers out with a straight edge on a self-healing mat. See how ragged they are?  My fix for that is sandpaper.  I used two grits - first was 320 to sand the paper up to the chipboard, then a finer grit of 600 (or higher) to "polish" the paper and get it ready for the next step.

Using sandpaper on your projects is a lot like using a good knife in the kitchen.  Choose the right tool and it will do the work for you.  You'll only need the smallest amount of pressure.  And maybe more patience.


White core on paper makes me squint and squish my nose, so I use the edge of a brush marker to color it in.  If you want to try this, keep light contact between the paper and marker -- the paper will soak up only what it needs.  Polishing the paper with the 600+ grit sandpaper keeps the sanded area from soaking up too much ink, so it's an important step.

I used the brush marker (brown or black) to color the edges of all the collage sheet elements.  When doing this, make sure you always come from behind, as I've done in the photo below.  It's easy to "fall off" the edge of the element (especially fussy cuts) and accidentally swipe a dark brush stroke on the surface.  Much better to have that on the back than the front!


Here's a view of the panels, ready for assembly.  The polka-dot panel is already attached to the Edgar panel (the back of the book).  I was a little eager and didn't photograph before putting those two together.

There are so many great motifs throughout Poe's writing.  Here I've included a raven, heart, cask, skull, and, of course, Lenore, all from Alpha Stamps collage sheets.  There's also a pendulum, eyes, premature burial, and doubles.  Oh... if only I'd used the 6x6 Arch Tunnel Book!  :)


Back to the project at hand, Susan... To create the space in between, I used layered strips of excess chipboard to separate the panels.  I save all kinds of board "just in case".  I'm not a pack rat... just a planner!


Once all the panels were attached, I covered the sides and back with heavy black card stock, and used the same for the top and bottom.


Thanks for your visit today!  You can view my complete Alpha Stamps supply list HERE.

Cheers
Susan


Other supplies used
My Mind's Eye paper
Heavy black card stock
Mod Podge
White glue
Zig glue pen to adhere dresden trim
Gold paint pen around interior window openings
Black gesso and acrylic paint
Black Tombow brush marker


Wednesday, June 19, 2019

Atelier: Mini Sewing-Themed Album

Hello creative friends!  I have an Alpha Stamps project to share with you today, made with gorgeous paper and a wee 4-inch chipboard album.

There's a feeling of nostalgia and comfort that comes from vintage sewing artifacts and ephemera.  I've collected enough bits and bobs over the years to have a vintage-sewing-themed guest bedroom, including an old singer treadle machine as a side table.

I was thrilled to see Stamperia's Atelier paper pad, a beautiful nod to seamstresses everywhere.  I couldn't wait to work with it.

Don't get me wrong - I am NOT a seamstress.  Funny story - when we lived in Pennsylvania, my husband and I hosted an annual Christmas party for a few neighbor friends.  There were a total of 4 couples and we did a funny gift exchange.  One year I made fleece pajama pants for everyone.  We had the weekend morning habit of wandering to someone's house for porch coffee -- usually in pajamas --  so I bought a pattern and matched the fleece designs to their personalities as best I could.  I sewed for months.  I was relieved when the last pair was finished, and tickled when everyone put them on at the party.  Needless to say, I haven't made a garment again.  It was fun to walk out my door and see those jim-jams that winter, though.

I mostly use my sewing machine on paper now, as you can see on each page of this tiny album. 


I loved working with this Memory Hardware Tiny Chipboard Album.  Leslie, our fearless Alpha Stamps leader, knew I wanted to embellish the heck out of this paper so she searched high and low for the perfect base.  Thanks Leslie!


The spine is white sticky canvas with a few coats of matte varnish to give it more structure and keep from fraying.  I supplemented the sticky back with white glue, just in case...


Let's take a peek inside!


The dress form on the right is great on it's own, so I only outlined it with a silver star jelly roll pen to give it a little sparkle.


Once they can no longer be worn, my husband gives me his old silk suspenders to reuse.  The collection of fabric "shirting" samples are actually very old quilt blocks that came in a large vintage sewing auction lot I won a few months ago.  These are my favorite pages of the whole album.


This is a small sampler of crochet laces.  I found the celluloid thread cutter in that auction box, also.


The dress form and thread top are just a few in the Atelier paper pad.  I wrapped brown ribbon around the waist and sewed a blue button with a lace scrap onto it.


A few notes on construction.  I painted the album edges white, and added linen hinging tape between each page to give a fabric-y look without adding any bulk.  It coordinates with the white canvas I used on the spine.


To help pick out a specific part of a paper design, I cut a piece of acetate to fit my item (in this case, the front and back covers), then hovered it over different designs until I find the perfect one.  After the outside was done, I trimmed the acetate to fit the pages, then set it aside for the next project.


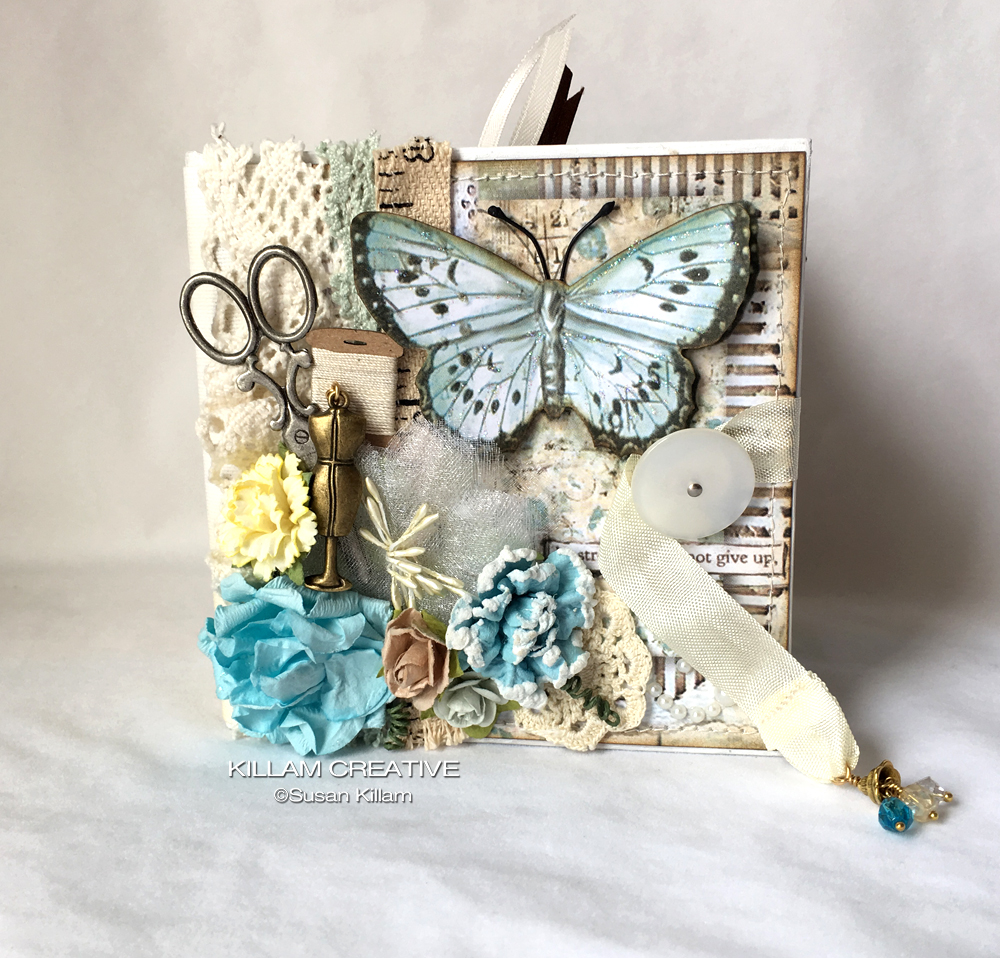
There is a fair amount of hand sewing here, including the large mother-of-pearl button closure.  I punched two holes in the chipboard before covering with papers and added the button at the end.  That message was appropriate since I poked my fingers a few times... ouch.


The suspenders were added before the page was attached to the book.  I sewed the buttons on and attached the suspenders part with a zig-zag stitch mirroring the one on the fabric.


The dress form charm dangles on a sturdy eye pin from the jewelry section of a craft store.  I used cream seam binding for the closure.  The other end is glued between the inside back cover paper and the chipboard. 


Thanks for your visit today!  A complete Alpha Stamps supply list for this project can be found HERE!

Cheers
Susan

Monday, March 4, 2019

I've Joined the Alpha Stamps Team!


I'm pleased as punch to announce that I'm now an Alpha Stamps design team member!  Alpha Stamps carries a huge line of supplies for your mixed media projects.  The collage sheet choices are astounding, plus there are all kinds of 3 dimensional bits and bobs to embellish your crafty life.

Check out the March Kit on the right sidebar --->   Each month AS has a new kit, and the design team  members show their take on it.  Sign up for the newsletter and you'll see our take on each month's theme, as well as get news on flash sales and the monthly giveaway.

Cheers!

Friday, May 18, 2012

Alpha Stamps Yahoo Group Challenge

Hiya! Over at the Alpha Stamps Yahoo Groups there's a reproduction challenge going on. The idea is to take techniques shared by Nichola Battilana of Pixie Hill and Alpha Stamp's design team and make your own version of her faerie folk specimen jars (holding official proof that the faeries exist!). Around the Internets you might know her as Knickertwist, too.

Here's a link to her Pixie Hill Studio shop so you can see how the professional does it... and here's my reproduction:


The jar is 1 5/8" tall and a minute 1/2" wide. That's small! The label reads:

Faerie Specimen 1.001
Found in a shipping box with this tag attached: "Canada or Bust!"

It's kind of a joke since Nichola just happens to be my swap partner on a Craftster swap and I'll be sending a wicked forest-themed matchbox her way in a week or two. Yea, she's in Canada...

The mushrooms are made with paper clay and painted with shimmery paint. There's a bit of glare from the lights on the glass, but that doesn't disguise the fact that I definitely need practice on my dots. :) It was fun (and kinda hard) to make, though!


Thanks for sharing your technique, Knickers! I can only hope I win the prize of fabulous Pixie Hill art stuffs... :)

Thanks for visiting today!

Cheers,
Susan