Showing posts with label Copic markers. Show all posts

Monday, July 4, 2011

TBS DT: Sketch and Christmas in July

Hello crafty friends! I hope all our American readers are having fabulous Independence Day celebrations. Today we celebrate the adoption of the Declaration of Independence.  July 4, 1776 was a monumental day in the history of the newly formed United States of America. Today we celebrate with parties, fireworks and pools. It's one big birthday party for the nation. Happy birthday!

So, with that said... at The Beary Scrap we're in the midst of our July Sketch Challenge. The design team is shaking it up a bit by adding a Christmas in July theme to our projects. Notice how that happens to go with our Christmas in July blog candy? Hey, we planned it right!

Of course, I'm ignoring the fact that I'm posting a Christmas card on July 4th...  but can't red and green be considered national colors, too? *grin*


This is Magnolia's "Tilda with Fir" and happens to be the stamp included with our challenge blog candy. Isn't she adorable? This is a pretty simple card made with papers that really seemed to do the designing work for me. They are from a Webster's Pages 6x6 pack. See the background paper? I used the front of the stack for this layer. Underneath the plaid layer is the "petit papers" logo - it's like getting an extra sheet in an already fabulous paper pad!

Card Recipe
Thanks so much for visiting today! Please join our Beary Sweet Sketch Challenge - all entries are eligible to win our blog candy as well as the $20 gift voucher! It goes on through July 14th - I hope to see *your* fun projects!

Cheers,
Susan

Monday, November 29, 2010

TBS DT: Anything Goes with Wrapped Tilda

Hello hello! Here we are at the end of The Beary Sweet Challenge #14: Anything Goes - tomorrow is the last day to enter your fabulous creations. Hurry HERE to enter for your chance to win a $20 gift voucher to The Beary Scrap!

Ok, so my last project for Anything Goes is a very simple Magnolia using Basic Grey "Eskimo Kisses". Don't you just love the colors?


The paper behind Wrapped Tilda is a glitter paper from my stash. I just love it because the glitter is embedded in the paper, with a clear coating over it. I embossed the holly paper with Cuttlebug dots and the light paper strip on the left with Cuttlebug swirls. I then used Star Dust Stickles on the swirls to enhance them.

Challenges
Card Recipe
Thanks for visiting today!

Cheers,
Susan

Monday, November 22, 2010

TBS DT: Anything Goes with a Banner

I'm thrilled that this sweet little Tilda is a Top 3 winner at Die Cut Dreams Christmas Challenge blog! Thanks so much!


This card was featured at the Little Red Wagon's Banner challenge. :) Thanks ladies!


Hello hello! This week the Beary Scrap design team continues with our BSC #14 "Anything Goes" samples, but with a twist! Our task is to jump on the banner bandwagon and include some kind of banner in our project.

Don't you just love the My Mind's Eye Holly Jolly line? This particular paper inspired me to create an outdoors scene. Here, darling Tilda is sitting on her bench, wishing for... more snow? Peace on earth? Pants? I'm not completely sure what's on her mind, but she's awfully cute anyway!


Both Tilda and her bench are colored with a combination of Copics and Prismacolor pencils with OMS. Her coat is covered with flocking powder to create a velvet texture. this is the first time I've tried flocking, and I like it!

The paper is dotted with Diamond Stickles. I've used a few different Stickles colors throughout: Star Dust (boot laces, accenting the Candy Cane Stickles on mitten, scarf, hair bows); Crystal (holly leaves); Diamond ("merry", branches paper, medallion); Frosted Lace (socks and hat); Candy Cane (coat trim, hair bows, scarf, hat). Phew! Is that all?

I created the "merry" banner and "bright" medallion on the computer. I really wanted the letters to look like they were hanging from the branch... It didn't turn out as well as the design in my mind, but it's still cute. :)

Challenges, Please :)
Card Recipe
  • Stamp: Magnolia
  • Paper: Bazzill Mud Pie; My Mind's Eye Holly Jolly - both sides of "Winter Branch"
  • Medium: Copics; Stickles (see list above); Prismacolor pencils with OMS; ColorBox Fluid Chalk in Chestnut Roan; DecoArt Snow Writer (at base of bench)
  • Embellishments: Holly Jolly trim pack; pins from stash; Holly leaves cut from Cricut; Prima felt branch
  • Adhesive: Glue Dots 1/8"; Scor-Tape; silicone
Thanks so much for stopping in! Our Beary Sweet Challenge #14 - Anything Goes! - can be found HERE. Please take a minute and join in the fun - you could win $20 voucher from The Beary Scrap!

Cheers,
Susan

Thursday, November 18, 2010

Philadelphia Flyers and Layering Chalk Ink

Update 11/22/10: This card has been entered at Make It Monday Linky Party for a possible weekly feature at Michelle's Pink Paper Paradise blog. In Michelle's words: "Its a great way to showcase your favourite card or project to new people. You can even revive an old post. So come along link up and check out the other submissions and remember is all about just sharing the creativity and you may even find yourself making some new blog buddies." How great is that? Thanks Michelle!


Hello crafty friends! We made it over the hump (day). Yay! Today I want to share the last of a series of birthday cards made for a dear friend to give to her granddaughters. I have loved the work, but admit it was challenging, too. Generally, my cards are made to tickle my own fancy. These cards were made for specific teen girls whom I've never met but know a little about.

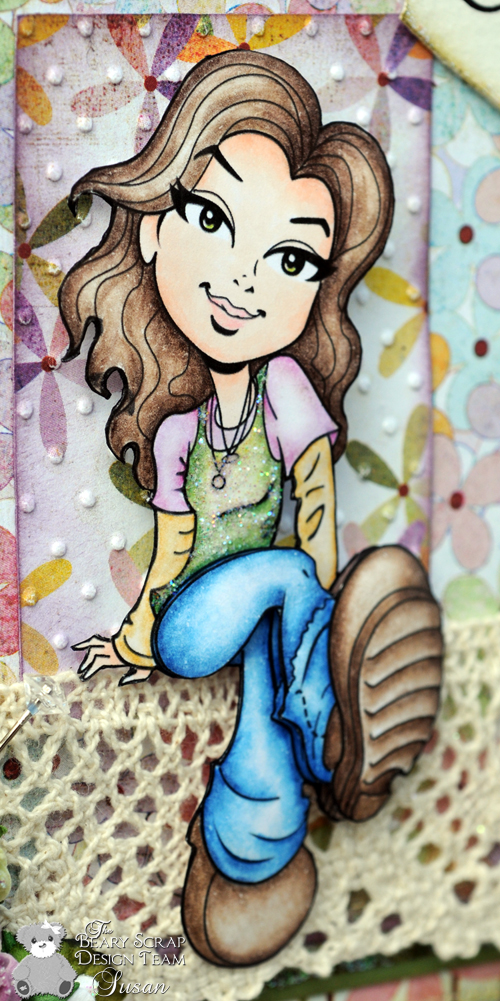
The most important thing I needed to know about Tiana is that she "bleeds Flyers orange". For a while I had no idea how to translate this onto a card ... until Kenny K released his All-Starz line. Hello Hockey Girl! I used Kenny K's images for the twins in July and the first November birthday. Kenny K has been very good to me and he doesn't even know it!


The ticket is my own design (duh) and the numbers are Tiana's birthday and age. I thought this was clever... *ahem* Susan=Dork.

What's up with the pennant, you ask? Weeelll, about 10 years ago I made this huge, wonderful Washington Redskins banner for friends. Each colored piece was hand-cut and layered from felt. I wish I had a good detail photo - sorry.


Then I made a Baltimore Ravens one for my husband, which I don't seem to have a photo of... (although it's hanging in the attic so I could show you if you want to make your own). This is a long way around to tell you sports teams and felt are in my blood. Ha! I figured since I could make these banners, why not a little pennant for the Flyers? Well , let me tell you, there's a biiig difference between a 30" x 40" banner and a 2" pennant. *sheesh* I am the queen of biting off more than I can chew! It worked out, though. I think it's cute, if obviously hand-cut! *grin*

Anyway, Hockey Girl is layered twice - the hat, left arm and left leg are all popped up. It kinda makes her a little more sassy, don'tcha think?


Oh, I wanted to share an example of layering chalk inks. I've talked about it before, and remembered to snap it in progress so you could see what I've been blathering on about. 

I first "edged" the paper in orange chalk, but it seemed too orange, so I added a little dark brown to the very edge and over the orange a little. 


See? The orange peeks through but has a little dimension now. That's the great thing about chalk inks - you can layer!


So here's the finished card with gift box. Honestly, I'm a little sad that it's all over. Julia, thank you *so* much for your friendship and your trust. You haven't seen this last card yet, so I hope with all my heart it makes you happy.


Challenges Entered
Card Recipe
  • Digital Stamp: "Hockey Girl" from Kenny K Downloads
  • Paper: Bazzill Basics in Mud Pie and Navel; Basic Grey Ambrosia in Tangy, Quince and Fresh Squeezed for the envelope
  • Medium: Copics for skin; Prismacolor pencils with OMS; Stickles in Icicle, Spiced Marmalade, Star Dust; Versa Magic chalk ink in Orange Spice and Jumbo Java
  • Embellishments: Kaisercraft Pearls; Ivory satin and sheer ribbons from stash; Mulberry flowers from Prima and The Beary Scrap; Pins from Grandma
  • Tools: Scor-Pal; Cutter Bee scissors; sewing machine; printer
  • Adhesives: Scor-Tape; Silicone glue; Glue Dots - I'm really liking these 1/8" ones in place of the normal foam dots I use. I suspect the foam dots don't stay on as long. I know heat affects them.
So,  there you have it! Thanks for stopping in today.

Cheers,
Susan

Monday, November 8, 2010

TBS DT: Thankful For You

Hello friends! Hope you had a great weekend. We had a little family gathering to celebrate Grandma's 89th birthday. Now my wonderful in-laws are visiting and doing a little granddog sitting while Husband and I have a wee midweek fling in Philadelphia. *grin*

This week the design team is using the BSC #13 sketch with a little added challenge just for us: Apple, Pear, Pumpkin. This is open to interpretation and could be the foods themselves, their colors, or a combination of the two. Or even something I can't think of right now. :) See? It's all open to interpretation *and* imagination... 

I had a little problem at first... 'specially since I'm dying to use my new Christmas papers which have nothing to do with apples, pears or pumpkins. I poked around my paper bins and found the awesome Pink Paislee 365°. Of course, it's absolutely perfect so I opted for "sketch plus colors".


You'll notice I barely layered on this one. *gasp* I was unsure about a green dress so I figured I'd try it on the bottom layer first. (Normally I don't completely color the bottom layer - just the edges.) It turned out so well that I decided to use it.


Card Recipe
  • Stamp - Magnolia
  • Paper - Bazzill Basics in Mud Pie; Pink Paislee 365° 6x6 pad and "Be Free" (stripes) in 12x12
  • Medium - Copic E0000, E01, E11 for skin; Prismacolor pencils with OMS; Colorbox Fluid Chalk in Chestnut Roan and Creamy Brown; Stickles Crystal and Diamond; Distress Stickles in Spiced Marmalade
  • Embellishments - Kaisercraft Pearls in Snow; May Arts Crocheted Lace (brand new in store - call to order); Satin ribbon (large and woven into lace) from stash; ticket - my design and Kimm's sentiment (thanks a bunch!)
  • Tools - Scor-Pal; Cuttlebug Embossing Folders
  • Adhesives - Scor-Tape and 1/8" Glue Dots
Hope you can find inspiration from this... and while you're feeling so inspired *grin*, please join our Beary Sweet Sketch Challenge! It's going on now through November 14th. See you there!

Cheers,
Susan

Monday, November 1, 2010

TBS DT: Birthday Girl for Sketch Challenge

Hello! Hope your weekend was great! We had a bit of a warm spell Sunday and got tons of yard work done. Yay! Sunday night we were entertained by trick-or-treaters. We saw some really fun costumes and absolutely adorable wee ones!

Here is my card based on the sketch challenge that starts today - it's made for a friend's granddaughter.


Challenge Entered
Card Recipe
  • Stamp: Kenny K
  • Paper: Bazzill Mocha Divine and Guacamole; Basic Grey Kioshi
  • Medium: Copic Sketch markers for skin tones; Stickles Lime Green, Crystal, Star Dust, Milled Lavender; Chestnut Zing! Embossing Powder; Prismacolor pencils
  • Embellishments: Mulberry Roses; Lace, pins and ticket from stash
  • Adhesives: Scor-Tape and Glue Dots
 Today starts the new Beary Sweet Challenge - we're on #13! Can you believe it? Here's the sketch:


 If you'd like to play along with our sketch challenge, go HERE for all the details - you could win a $20 gift voucher to The Beary Scrap!

Thanks for visiting!
Cheers,
Susan

Friday, October 29, 2010

Edwin's Pirate Costume

Hiya! Here I am again with another Halloween Maggie. Isn't Edwin the cutest? I'm including a lot of photos - please let me know if it takes too long to load and I'll fix it for future viewers.


He's layered, of course. I also layered the sign - it's hard to see, but the sword handle and the bottom roll are both popped off the base layer. The sword and the skull and crossbones are covered in Glossy Accents.


I colored skin tones with Copics and the rest with Prismacolor pencils. I finally have more Copics in color families so I can start practicing. Just need to make the time!

Challenges
Cheers,
Susan

Monday, October 18, 2010

TBS DT: Dracula Edwin

Hello hello! It's Monday, and you know what *that* means... It's my day to show you a Beary Sweet Challenge-inspired sample. Our BSC #12 challenge is to use misting on your project, and I've Glimmer Mist'd the heck outta Dracula Edwin and his lair. No, it's not garlic-flavored Glimmer Mist! I'd like to keep this little cutie around for a while, but he's already spoken for. *sigh*


I did "the usual" with pearl Glimmer Mist - spritzed the flowers (except the velvet Petaloo), black branches and vintage vampire fang tag. The best part of my misting, though, is the dry-embossed coffin - I dipped a teeny tiny paint brush into the Glimmer Mist bottle and painted the embossing! How cool is that?! I also painted Edwin's bow tie, purple cape trim and shoe strings. I really like the effect and definitely plan to use it with other mist colors.


Here is a glimpse of the easel flap. Inside is a panel for Happy Halloween greetings.


Card Recipe
Thanks for stopping in today! All week you'll find inspiration for our current Beary Sweet Challenge on "Misting". You can use any kind of misting embellishments - even handmade ones. Come join us for your chance at a $20 gift voucher to The Beary Scrap!

Cheers,
Susan

Friday, October 1, 2010

CLP DT: #30 Halloween

Hello hello! So happy to see another month roll around... er, that doesn't sound right, 'specially since time flies faster the older I get. Let's rephrase that, shall we?

Hello hello! So happy to show you another CLP challenge. The first of the month is always exciting, and this one even more so since we have a  fabby challenge sponsor: Spesch Designer Stamps! It was wayyy cool to play with the new release - I used the Halloween girl digi created by Max. Thanks, Tracey, for letting us play with your adorable images!


Isn't she delicious? (Haha, if I do say so myself...) I love her so much it's almost painful. Really! The colors on the Bo Bunny and 7 Gypsies papers are a perfect foil for her wild pumpkin skirt. The layering turned out well - next time I use her I'll add another hat layer. I do love my layers!


Here is Chelsea's gorgeous sketch. Doesn't it get your creative juices flowing?


So, how can you play along? Use Chelsea's CLP #30 sketch for your project and upload it HERE by October 31st. You could win 4 digital images from Spesch Designer Stamps!

Challenges, Please
Card Recipe
  • Stamp: Halloween Digital Stamp by Max at Spesch Digital Stamps
  • Paper: Bazzill Basics black; Bo Bunny's "Mama-Razzi"; 7 Gypsies "Nottinghill"; My Mind's Eye Night Light "Halloween Wishes"
  • Medium: Prismacolor pencils with OMS; Copic for skin; Stickles Star Dust, Diamond; Colorbox Fluid Chalk Charcoal
  • Embellishments: Prima corner pearls; American Crafts "Eek" ribbon; May Arts black webbing ribbon from the FABULOUS Patricia - thanks sweetie!; Copper brads from stash
See you there!

Cheers,
Susan

Monday, April 12, 2010

"Things With Wings" Week at TBS

Edit 4/19: I'm really pleased to announce I won over at Roses on Paper for their "Layers" challenge. Thanks Summer and Mr. Random! *grin*
 
Hello hello! I'm here, ringing in another Monday with The Beary Scrappy Gals. Who knew I'd love Mondays so much?!

Spring is such a wonderful season - we had another glorious weekend here in Maryland. I hope you did, too! Our temperatures were considerably lower than last weekend's "heat wave", but the yard work was the same. There's so much to do in the Spring! We pulled a ton of weeds, fertilized the lawn, and trimmed up a few shrubs and a holly tree. I'm pretty sure a Robin is building a nest in the holly tree, so I worked quickly. She chirped at me quite a bit!

Speaking of birds, it's "Things With Wings" week at The Beary Scrap. I start the week with Magnolia's Edwin, and Gini will end our week with a great Tattered Angels tutorial. In between you'll be inspired by fabby projects from Patricia and Jamie, and perhaps a bonus from yours truly. *wink* I'm really inspired by this theme!

If you've been reading me for a little while, you'll know I'm obsessed with a new convert to Magnolia stamps. This is Edwin, chasing after these beautiful MS punched butterflies.

Oh my! I was thrilled when Kimm told me about this Monarch punch, so much so that she loaded it onto The Beary Scrap store site while we chatted just so I could order it right then and there. How's that for incredible customer service? Thanks Kimm! 
The bottom butterfly layer is punched from BG Kioshi "Sayuri" and edges are inked with purple. The top layer is purple vellum, and was an adventure to create. I started with "Stickling" the edges... they curled up a bit but it wasn't too bad. After that dried I decided "More is Better!" and Stickle'd one whole wing. Can you imagine the curling from that much glue? Haha! (No, I didn't learn my lesson from the first application.) Fixing this involved a heat gun and a certain amount of contortion to keep it from rolling up as it dried. Good thing I have that third hand... just kidding!

Ok, so here's a better way of Stickling vellum: put a few dots of Tombow Multi 2-way glue on the back of a fresh butterfly and let dry so it is repositionable. Adhere this to scrap paper and Stickle away! Either let air dry or use your heat gun to dry the Stickles. Once dry you can remove it from the scrap paper. So much easier!

I have a special 'Thank You' to our very own DT Patricia for inspiring my pearl butterfly trails. Thanks sweets! :)

Oh, and the neato grass technique is from Paula Tracy's tutorial at Splitcoaststampers. Isn't it cool?

Challenges

Card Recipe
Thanks for stopping in!

Cheers,
Susan

Thursday, February 11, 2010

SSD Dare To Be Sassy Challenge!

Hiya friends! The snow just keeps coming here in Maryland. Living near the beach, I guess I should just imagine it's a whole lotta white sand, right? Can't quite figure out the sand in the trees, though... haha!

It's Dare to be Sassy Thursday, and today I have a Sassy Studio Design DT card for you. If you take on our challenge to make a project with a Sassy image, 3 hearts and loads of bling, you could win 2 Sassy Studio Designs images! Deadline to enter is 2/17, so hurry up and get Sassy!

I'm playing around, trying to find my "vintage style". If I'd thought ahead, I would have colored this lovely girl differently... buut I didn't. (I'm not keen on the blue shirt and may switch it out for another color - she's on pop-dots and easily removable...) *grin* I've had this floral Anna Griffin paper in my stash for a while. I absolutely love it! I machine-sewed the flat lace, scrunching it up while trying not to run a needle through my fingers. The three hearts were hand cut, balled up, flattened out (sort of) and then edges were inked. *Then* I decided I needed a little sparkle so I sprayed Glimmer Mist Pearl and then needed to ball them up again since the liquid flattened them out too much. *Again* with the planning ahead... :)

I really like the effect on the hearts. The pink paper is embossed with a Cuttlebug folder and spritzed with the same pearl Glimmer Mist. The polka dot paper is studded with sparkly Stickles.
Challenges
 Card Recipe
Stamp: Sassy Studio Designs "Giving Thanks" from the Fall Release
Paper: MME Bohemia Blossom Mi Amore, Anna Griffin rose, stash
Medium: Copic sketch for skin, Prismacolor pencils w/OMS and elbow grease, Glimmer Mist, Stickles
Embellishments: Surpisingly few! Lace from stash, Prima pearl flourish (cut up)