Saturday, January 27, 2018

She's The Talk of the Town

Hello crafty friends!  I found a few cool Vargas pin-up girl playing cards recently and couldn't wait to use them on my Gypsy Soul Laser Cuts project.  Luckily the ATC Shrine Box w/Feet is the perfect size for playing cards.  Who knew?!


I started with standard assembly, which for me means making sure I have all the parts going in the right direction before gluing in place.  I learned the hard way.... *ahem*


I suggest you glue  top and bottom first so you can slide walls on.  As you can see in the photos, I put the right side wall on first without thinking ahead about that bottom notch.  It didn't end up being a  hardship, but I did have one of my "Huh... ok" moments.  They are more frequent that I should admit.


Once dry, I slathered the whole box with black gesso.


Gesso dries pretty quickly so I tapped my fingers a few times, or did something equally speedy.  I then measured the exterior and interior paper panels and cut out with a paper cutter.


I needed to tweak this side panel a bit.  There's a joke about measuring twice, cutting once.  Bah, whatever.


Here I have everything cut out.  I inked the edges with black just to get rid of the too-bright white core.


Mod podge it all together!


I've jumped ahead a bit in the photos.  After the mod podge dried I added a layer of lace, then a layer of rhinestones on the inside edges.  Diamonds are a girls best friend, right?


I used black dotted Dresden trim for the front edges and around the frame.  Glossy accents is a good adhesive since it has a small nozzle, but any glue will do.  


After all the trim was placed and the reverse side lettering was attached, I covered it all with a layer of matte varnish to seal and give a nice finish. I used E-6000 to attach the word blocks.


Thanks for stopping at the Gypsy Soul Laser Cuts blog today.  I hope we can inspire you on your next projects!

Cheers,
Susan

Gypsy Soul Laser Cuts Used
ATC Shrine Box w/Feet #BD12F

Other Supplies Used
Prima Romance Novel 6x6 paper pad
Dresden trim
Vintage tattered lace
Rhinestone trim
Vintage playing card
Vintage word blocks
Mod Podge
Glossy Accents
E-6000

Tuesday, January 9, 2018

American Dream Shadow Box

"The American Dream is that dream of a land in which life should be better and richer and fuller for everyone, with opportunity for each according to ability or achievement."    --James Truslow Adams, historian, 1931
****

Hi crafty folks!  Today I want to share a vintage-style American dream tucked inside the 4" x 4" Mini House Room Box.  This young couple is just starting out and have saved their pennies for a home.  Let's build it!


First thing is a bit of a warning that this is an image-heavy post.  A lot goes into home construction.  ::nod nod::

I measured and cut vintage ledger paper to cover the back wall (including the attic area) and side walls.

Then I laid out the parts before gluing  -- notice the right wall is upside down?  Luckily I did, too.


Brick is my favorite construction and this young couple deserves the best!  I used the Brick Wall 2 stencil and molding paste on the back and sides.  Allow it to dry overnight.


For the roof I used the pointed Chipboard Shingles.  I gesso'd a bunch then cut them down to 4 points each, which allowed me to stagger the points.  Next thing was to glue them down and allow to dry, then cut with heavy duty scissors.  I tried to use a guillotine paper cutter but the shingles were too thick.  A little sanding helped to clean up the cuts.


Time to paint the bricks!  This isn't a real brick factory so I had to paint them... You know how it is.  I've made bricks a couple of ways so far, and this time I used my education teammie Nicola Battilana's video tutorial.  It was very helpful!


I glued tiny little rocks to the base and let it dry overnight.


So back to the roof!  I needed to cap it off.  My idea was to cut a piece of thin chipboard, score it, and glue it down.  In the second photo, you can see I found a big enough blank in the middle of another GSL Cut laser cut.  Yay!   


To finish off all the roofing edges I mixed molding paste with black gesso (even though the photo shows acrylic paint -- oops).  I carefully applied it to the peak and all the edges in layers, allowing it to dry each time.  It took a couple of layers to fill it all in and look like roofing tar.  Or whatever that's called.  The black stuff!


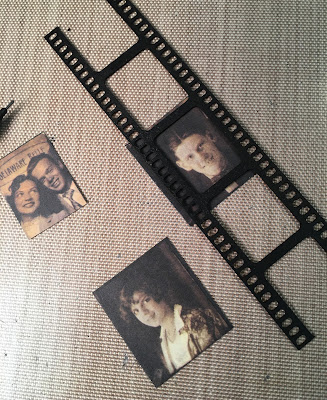
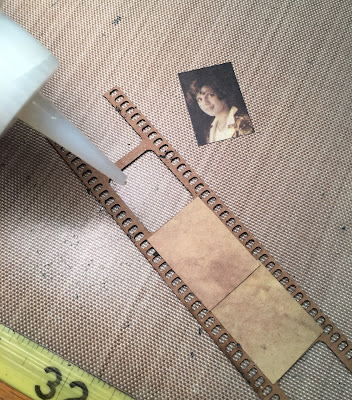
For an inside element  I used a piece of felt (just because it was close by) to dab black paint on a Filmstrip Mini Sheet then cut down photos of the couple.


And finally, they moved in!


Here's a view of the filmstrip and see their first house number plate?  That's from the white set of Faux Metal Number Plates.  There is a mini wood spool popping out from the back wall.


Here's a finish view of the roof peak.  See how I softened the edges with the molding paste mixture?  Once that was dried I did a bit of finish work with a fine sand paper and coated it all with flat black paint.


GSL Cuts Used
Mini House Room Box 4x4 Open #D13WB
Chipboard Shingles - Pointed #D119P
Brick Wall 2 #D42D
Filmstrip Mini Sheet D12J
Faux Metal Number Plates (White) #LN042114001

Monday, November 20, 2017

Altoid Tin Lid Ornaments

Hello crafty friends!  Last week I had a table set up for a local "3rd Friday"/Holiday Bazaar.  It was coooold and it took the whole weekend to thaw out.

Today I want to share 2 Altoids tin lid ornaments made from leftover paper.  In my last blog post I shared bright Christmas cards made with Blue Fern Vintage Christmas and Vintage Christmas 2.  (I've been hoarding the paper for a while but I think it's from 2015-ish.)

Anyway, I had the ephemera-card-type scraps and layered them into leftover Altoids tin lids!


Neat, huh?  They came together pretty quickly except for Stickles drying time... Oh how I love Stickles!  i used a nail and hammer mat to poke holes for the beaded charm and the hanging string.  Let me know if you have any construction questions -- I'm happy to help!

Thanks for your visit today!

Cheers,
Susan

Tuesday, November 14, 2017

Something Wicked Shadow Box

Hello crafty friends!  Today I want to share a steampunk-y shadow box made from Gypsy Soul Laser CutsATC Shrine Box.


The first thing to do is wipe down the edges with a damp cloth to remove laser residue (if any).  Lay the pieces out and put a dab of glue on the edges that fit together.  I did one panel at a time and held in place for a few seconds to give the glue a chance to catch.  Let this dry completely before measuring for paper inserts.


I used a corner of the 12x12 Texture Sheet Gears for the inside back, embossing it with a red/black/brown powder mixture I made a few projects ago.


I wanted a dash of color so I cut off a piece of the Banner Border Strips, traced each pennant on a different scrap of paper, then painted the pennant with black gesso.  While that dried I cut the triangles and inked the edges.  They are all slightly larger than the actual chipboard piece and overlap nicely to cover the space between each triangle.

I use the Zig glue writers a lot, and this one came in handy to draw a line on the pennant edges and allow me to easily apply the papers.


Next I picked out a few gears and backgrounds from the Steampunk Shape Set and painted them with  metallic paints I have on hand.


Once everything was dry I assembled in a whirlwind and didn't stop to take photos.  *sigh*  In the next two photos you can see the hint of the texture gear sheet in the back.  I chose a plain paper (black with white dots) so attention wasn't diverted from the embossed texture gears.

The pennants are raised up on a layer or two of scrap chipboard for added dimension.  You can also see the metallic gears layered in the right front corner, on which a black cat is perched.


I used more plain paper for the inside walls and ended up using strips of straight black Dresden foil  to finish the inside corners.  Once the outside was covered I used a more ornate Dresden foil to finish the front frame.


Here's a look at the back!


Thanks for visiting today!

Cheers ~ Susan

Gypsy Soul Laser Cuts Used

ATC Shrine Box BD12X
Texture Sheet Gears HR1
Steampunk Shape Set D33A
Banner Border Strips D34D

Other Supplies Used:
Graphic 45 Steampunk Spells
assorted acrylic paint
custom embossing powder
white glue
Zig writer glue
Brown ink for edges
Dresden foil
wood feet
assorted ribbon